

Welcome to the definitive guide to mastering a true cornerstone of Southern comfort food: Chicken Fried Chicken. While the name often confuses those new to the style, “Chicken Fried” refers to the specific culinary technique of preparing a boneless chicken breast in the exact same manner as a traditional country-fried steak. This means a heavy, seasoned flour dredge, a rich buttermilk wash, and a second trip through the flour to create those iconic, craggy, golden-brown ridges that define high-quality soul food. This is a dish that prioritizes texture as much as flavor, delivering a deafening crunch that gives way to an incredibly juicy, tender interior.
In this professional guide, we will explore the science of the double-dredge, the importance of chemical leaveners like baking powder and baking soda in achieving a light yet crispy crust, and the art of crafting a traditional milk gravy using the flavorful “fond” and oil left over from the frying process. Whether you are cooking for a Sunday family gathering or simply looking to master the art of the skillet, this comprehensive breakdown will ensure your results are consistent, professional, and undeniably delicious.
Why This Recipe Works
The secret to extraordinary Chicken Fried Chicken lies in the architecture of the breading. Unlike a standard breaded cutlet, this recipe utilizes a specific combination of baking powder and baking soda within the dry mixture. When these leaveners hit the acidic buttermilk and the high heat of the frying oil, they create tiny carbon dioxide bubbles. This reaction lifts the breading away from the meat just slightly, creating an airy, shattered-glass texture rather than a heavy, leaden shell.
Additionally, using thin-sliced chicken breasts is a strategic culinary choice. Because the chicken is thin, it cooks through at the exact same rate the breading reaches a perfect golden brown. This prevents the common pitfall of “burnt crust, raw center” that often plagues thicker cuts. By the time you finish this guide, you will understand how to balance heat, timing, and technique to produce a masterpiece of Southern frying.
The Essential Ingredients
To achieve the perfect results, you must use the exact measurements and components listed below. Each element serves a specific structural or flavorful purpose in the final dish.
The Chicken and Frying Base
- 6–8 thin sliced chicken breasts (patted dry for maximum adhesion)
- High-heat oil for frying (such as vegetable, canola, or peanut oil)
The Dry Coating Mixture
- 2 cups all-purpose flour
- 2 tsp baking powder (for lift and airiness)
- 1 tsp baking soda (for browning and crunch)
- 1 tsp fine sea salt
- 1 tsp freshly ground black pepper
- 1 tsp garlic powder
The Wet Binding Mixture
- 1 1/2 cups full-fat buttermilk (the acidity tenderizes the meat)
- 1 large egg
- 1 tbsp hot sauce (for a subtle back-of-the-throat tang, not just heat)
The Savory White Gravy
- 1/4 cup reserved frying oil (infused with the flavor of the chicken)
- 1/3 cup all-purpose flour
- 2 cups whole milk
- Salt and pepper to taste
Step-by-Step Preparation Method
Mastering the fry requires a focus on “mise en place”—having everything ready before the first piece of chicken hits the oil. Follow these steps meticulously for the best results.
Preparing the Dredging Station
Begin by setting up three distinct areas: your dry mixture, your wet mixture, and a clean plate for the finished, raw breaded chicken. In a shallow bowl, whisk together the 2 cups of flour, baking powder, baking soda, salt, pepper, and garlic powder. In a second shallow bowl, whisk the buttermilk, egg, and hot sauce until the mixture is a uniform pale orange. Having these side-by-side minimizes mess and ensures a smooth workflow.
The Double-Dredge Technique
To achieve that professional, craggy crust, you must follow the “Dry-Wet-Dry” sequence. First, take a dry chicken breast and dredge it in the flour mixture, shaking off any excess. Next, submerge it completely in the buttermilk mixture. Finally, return the chicken to the flour bowl. This time, use your palms to firmly press the flour into the wet coating. This “pressing” action is what creates the beautiful flakes and ridges that turn extra-crispy in the oil. Place the breaded cutlets on a wire rack for 5 minutes before frying; this helps the breading “set” so it doesn’t fall off in the pan.
Achieving the Perfect Fry
In a deep, heavy-bottomed pan (cast iron is preferred for heat retention), add enough oil to reach about 1 inch deep. Heat the oil to exactly 325°F (165°C). Carefully lower the chicken into the oil, working in batches to avoid crowding the pan. If the oil temperature drops too low, the breading will absorb the grease and become soggy. Fry for 3–5 minutes per side. Once the chicken is a deep, honey-gold and the internal temperature reaches 165°F, remove it and let it drain on paper towels or a wire rack to shed excess oil.
Crafting the Savory Milk Gravy
Do not discard all of your frying oil! The oil left in the pan is packed with toasted flour and chicken seasoning. Carefully measure out 1/4 cup of this hot oil and place it in a separate skillet or clean pan. Whisk in 1/3 cup of flour and cook over medium heat for about 1 minute. You are looking for a “blonde roux”—it should smell slightly nutty but not turn brown. Slowly, in a steady stream, whisk in the 2 cups of milk. Continue whisking constantly as the mixture simmers; the starches will expand and thicken the liquid into a silky, opaque gravy. Season generously with salt and a lot of black pepper.
Expert Tips for the Best Results
The Importance of Oil Temperature
Using a kitchen thermometer is the difference between greasy chicken and crispy chicken. If your oil is below 325°F, the breading will sit in the oil and soak it up like a sponge. If it is too far above 350°F, the outside will burn before the chicken is safe to eat. Maintain a steady heat and allow the oil to return to temperature between batches.
Don’t Skimp on the Pepper
Southern white gravy is traditionally “peppery.” While the recipe calls for salt and pepper to taste, don’t be afraid to be assertive with the black pepper in the gravy. It provides the essential counterpoint to the richness of the milk and the fried coating of the chicken.
Frequently Asked Questions (FAQ)
Can I use regular milk instead of buttermilk for the wet mixture?
While you can use regular milk in a pinch, buttermilk is highly recommended. The acidity in buttermilk performs two jobs: it breaks down the protein fibers in the chicken (tenderizing it) and it reacts with the baking soda to create a lighter, crispier crust. If you don’t have buttermilk, you can make a quick substitute by adding 1 tablespoon of lemon juice or white vinegar to 1.5 cups of regular milk and letting it sit for 5 minutes.
Why does the breading fall off my chicken when I fry it?
This usually happens for two reasons. First, the chicken might have been too wet when you started. Always pat the meat dry with paper towels before the first flour dredge. Second, you might be turning the chicken too soon. Let the first side cook undisturbed for at least 3 minutes so the crust can fully harden and “lock” onto the meat before you flip it.
How do I keep the chicken warm while I make the gravy?
The best method is to place a wire rack over a baking sheet and put it in an oven set to 200°F (95°C). The wire rack allows air to circulate around the chicken, preventing the bottom from getting soggy, while the low oven heat keeps the meat at a safe serving temperature without overcooking it.
My gravy is too thick; how can I fix it?
Gravy can thicken very quickly as it simmers. If it becomes too paste-like, simply whisk in an additional tablespoon of milk at a time until you reach your desired consistency. Remember that gravy will continue to thicken as it cools, so it is often better to take it off the heat when it is just slightly thinner than you want it to be.
Can I make this with chicken thighs instead of breasts?
You certainly can, though you will need to adjust the cooking time. Boneless, skinless chicken thighs are generally thicker and contain more fat, so they may need an extra 2–3 minutes of frying time to reach a safe internal temperature. Ensure you use a meat thermometer to check for 165°F at the thickest part of the thigh.
PrintThe Ultimate Southern Guide to Crispy Chicken Fried Chicken and Savory Gravy
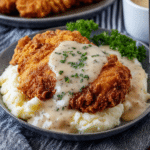
Crispy Chicken Fried Chicken with Savory Gravy is a classic Southern comfort dish featuring crunchy fried chicken smothered in rich homemade gravy.
- Prep Time: 15 minutes
- Cook Time: 20 minutes
- Total Time: 35 minutes
- Yield: 4–6 servings
- Category: Main Dish, Southern
- Method: Fry / Stovetop
- Cuisine: Southern American
Ingredients
Chicken
- 6–8 thin sliced chicken breasts
- Oil for frying
Dry Mixture
- 2 cups flour
- 2 tsp baking powder
- 1 tsp baking soda
- 1 tsp salt
- 1 tsp pepper
- 1 tsp garlic powder
Wet Mixture
- 1 1/2 cups buttermilk
- 1 egg
- 1 tbsp hot sauce
Gravy
- 1/4 cup reserved frying oil
- 1/3 cup flour
- 2 cups milk
- Salt & pepper to taste
Instructions
- Heat oil to 325°F (165°C) in a deep pan.
- Mix dry ingredients in one bowl and wet ingredients in another.
- Dredge chicken in flour, then wet mixture, then flour again, pressing to coat well.
- Fry chicken 3–5 minutes per side until golden and cooked through.
- Drain on paper towels.
- For gravy, heat reserved oil and whisk in flour; cook for 1 minute.
- Slowly whisk in milk until thickened.
- Season with salt and pepper.
- Serve gravy over fried chicken.
Notes
- Double dredging helps create extra crispy coating.
- Keep oil temperature steady for best results.
- Gravy thickens more as it cools.