

Introduction: A One-Skillet Journey to Tropical Comfort
There are certain dishes that transport you the moment you take your first bite. The aroma of coconut milk simmering with garlic and ginger. The warmth of cumin and coriander clinging to golden-seared chicken. The creamy, fragrant rice that somehow feels both exotic and deeply familiar. Coconut Chicken and Rice is one of those dishes—a meal that bridges continents, bringing together the bold spices of Latin cuisine, the creamy coconut traditions of Southeast Asia, and the comforting simplicity of a one-skillet dinner.
This recipe is a celebration of contrasts. The chicken is seared until golden and crisp on the outside, tender and juicy within. The rice is cooked directly in coconut milk, transforming plain grains into something luxurious and aromatic. The spices—cumin, coriander, paprika, garlic, and onion—create a warm, earthy foundation that complements the sweetness of the coconut without overwhelming it. And the finishing touches: a squeeze of fresh lime, a shower of cilantro, a sprinkle of toasted coconut. Each element works in harmony, yet each stands out on its own.
What makes this recipe particularly brilliant is its efficiency. Everything comes together in a single skillet (or a skillet and a saucepan, depending on your preferred method). The chicken is seasoned, seared, and set aside. The same pan is used to build the coconut rice, capturing all the browned bits left behind by the chicken. The result is a meal that tastes like you spent hours in the kitchen, but the active cooking time is under 30 minutes.
This dish is also remarkably adaptable. It works beautifully with chicken breasts or thighs. It welcomes substitutions (vegetable broth for chicken broth, brown rice for white—with adjustments). It scales easily for crowds and can be dressed up for company or kept simple for a weeknight family dinner. It is naturally gluten-free, dairy-free, and can be made paleo or Whole30 with minor modifications (see the FAQ section).
In this article, we will explore every nuance of Coconut Chicken and Rice. We will discuss the best ingredients, from choosing the right coconut milk to understanding the role of each spice. We will walk through a detailed, step-by-step method that ensures success, whether you are a confident cook or a kitchen novice. Finally, we will answer the most frequently asked questions, offering substitutions, storage tips, and creative variations to make this recipe a permanent fixture in your dinner rotation.
Heat your skillet. It is time to cook something creamy, fragrant, and unforgettable.
Ingredients: The Building Blocks of Creamy, Aromatic Perfection
Before we fire up the stove, let us take a moment to understand each ingredient. This recipe has three main components: the seasoned chicken, the coconut rice, and the garnishes. Every item on this list has a job, and understanding those jobs is the key to culinary success. Below is the complete list, followed by detailed notes on selection, quality, and potential substitutions.
For the Chicken:
- 4 boneless, skinless chicken breasts (or thighs)
- 1 tablespoon olive oil
- 1 teaspoon ground cumin
- 1 teaspoon ground coriander
- 1 teaspoon garlic powder
- 1 teaspoon onion powder
- ½ teaspoon paprika
- Salt and pepper, to taste
- 1 tablespoon fresh lime juice
For the Coconut Rice:
- 1 cup long-grain white rice
- 1 ½ cups coconut milk
- 1 ½ cups water or chicken broth
- 1 tablespoon coconut oil
- 1 small onion, diced
- 2 cloves garlic, minced
- 1 teaspoon grated fresh ginger (optional)
- Salt to taste
For Garnish (Optional):
- Fresh cilantro or parsley
- Lime wedges
- Toasted shredded coconut
Cook Mode Note: As you prepare this recipe, you may want to prevent your screen from going dark. Most devices offer a “stay awake” or “cook mode” setting in their display options, allowing you to reference the instructions without constantly tapping the screen.
Ingredient Deep Dive: The Chicken
1. Boneless, Skinless Chicken Breasts or Thighs (4)
Chicken is the protein centerpiece of this dish. Breasts are leaner and milder in flavor; they cook quickly and stay juicy when not overcooked. Thighs are richer, more forgiving (harder to dry out), and have a deeper, more savory flavor. Either works beautifully; choose based on your preference. If using breasts, look for ones that are similar in size so they cook evenly. If they are very thick (more than 1 inch at the thickest point), consider butterflying them (slicing horizontally almost all the way through and opening like a book) or pounding them to an even thickness.
2. Olive Oil (1 tablespoon)
Olive oil is used to sear the chicken. It has a relatively high smoke point and adds its own fruity, peppery flavor. Extra-virgin olive oil is ideal. If you do not have olive oil, avocado oil or vegetable oil are fine neutral substitutes.
3. Ground Cumin (1 teaspoon)
Cumin is a warm, earthy spice with a slightly nutty, peppery flavor. It is a cornerstone of many Latin, Middle Eastern, and Indian cuisines. Here, it provides a savory depth that anchors the spice blend. Use fresh ground cumin for the best flavor; if you have cumin seeds, you can toast and grind them yourself.
4. Ground Coriander (1 teaspoon)
Ground coriander comes from the seeds of the cilantro plant. It has a bright, citrusy, slightly floral flavor that complements the cumin beautifully. Together, cumin and coriander are a classic pairing, creating a warm, aromatic foundation for the chicken.
5. Garlic Powder (1 teaspoon)
Garlic powder provides a concentrated, savory garlic flavor that adheres to the chicken during searing. Unlike fresh garlic, it will not burn in the hot skillet. Use pure garlic powder, not garlic salt, which contains added sodium.
6. Onion Powder (1 teaspoon)
Onion powder adds a sweet, savory, allium-based note that supports the garlic and cumin. It dissolves into the spice rub seamlessly. Do not substitute onion salt.
7. Paprika (½ teaspoon)
Paprika adds color (a warm reddish-orange hue) and a subtle, sweet, peppery flavor. Smoked paprika can be substituted for a deeper, more complex, almost bacon-like note. Do not use hot paprika unless you want additional heat.
8. Salt and Pepper (to taste)
These foundational seasonings enhance the natural flavor of the chicken. Use kosher salt or fine sea salt rather than table salt. Freshly ground black pepper adds a subtle warmth and bite.
9. Fresh Lime Juice (1 tablespoon)
Lime juice adds brightness and acidity that cuts through the richness of the coconut rice. It is used to finish the chicken, adding a fresh, tangy note that lifts the entire dish. Use fresh lime juice, not bottled, which lacks the same vibrant flavor.
Ingredient Deep Dive: The Coconut Rice
10. Long-Grain White Rice (1 cup)
Long-grain white rice (such as jasmine or basmati) is ideal for this recipe. It cooks up fluffy and separate, with each grain distinct, rather than sticky or clumpy. Jasmine rice has a subtle floral aroma that pairs beautifully with coconut. Basmati rice is slightly nuttier and more fragrant. Do not use short-grain rice (like sushi rice) or medium-grain rice (like Calrose), which will become too sticky. Brown rice can be used but requires adjustments (see FAQ section).
11. Coconut Milk (1 ½ cups)
Coconut milk is the star of the rice, providing creaminess, richness, and a delicate tropical sweetness. Use full-fat canned coconut milk for the best results. The fat content is essential for creating a luxurious, creamy texture. “Light” coconut milk contains less fat and more water, resulting in thinner, less flavorful rice. Shake the can well before opening, as the cream and water can separate. Do not use coconut cream (too thick and rich) or sweetened coconut milk (too sweet, meant for beverages).
12. Water or Chicken Broth (1 ½ cups)
The liquid is split between coconut milk and either water or chicken broth. Using chicken broth adds savory depth and umami, making the rice more complex and flavorful. Using water results in a cleaner, purer coconut flavor. Both work well; choose based on your preference. If using broth, low-sodium is recommended to control the salt level.
13. Coconut Oil (1 tablespoon)
Coconut oil is used to sauté the aromatics. It adds a subtle coconut flavor that reinforces the coconut milk. If you do not have coconut oil, butter, olive oil, or vegetable oil can substitute, though the coconut flavor will be less pronounced.
14. Small Onion (1, diced)
Onion adds sweetness, depth, and aromatic backbone. A yellow or white onion is preferred; red onion can be used but will be slightly sharper. Dice the onion finely (about ¼-inch pieces) so it softens and melds into the rice.
15. Garlic (2 cloves, minced)
Fresh garlic adds pungent, aromatic depth. Mince the garlic finely so it distributes evenly throughout the rice. For the best flavor, use fresh garlic cloves rather than pre-minced jarred garlic.
16. Fresh Ginger (1 teaspoon, grated, optional)
Ginger adds warmth, brightness, and a subtle peppery zing. It is optional but highly recommended—it elevates the dish from simple to exceptional. Grate the ginger using a microplane or the fine side of a box grater. Do not substitute dried ground ginger, which has a different flavor profile and can be bitter.
17. Salt (to taste)
Salt is essential for seasoning the rice. Because coconut milk is naturally low in sodium, you will need to add salt to bring out its flavor. Start with ½ teaspoon and adjust to taste.
Ingredient Deep Dive: Garnishes
18. Fresh Cilantro or Parsley
Cilantro adds a bright, citrusy, herbaceous note that complements the lime and coconut. If you are one of the people for whom cilantro tastes like soap, use flat-leaf (Italian) parsley instead. Both add a pop of fresh green color.
19. Lime Wedges
A final squeeze of fresh lime over the finished dish brightens all the flavors and cuts through the richness of the coconut. Serve lime wedges on the side so everyone can add to their taste.
20. Toasted Shredded Coconut (optional)
Toasted coconut adds a delightful crunch and an extra layer of coconut flavor. To toast shredded coconut: spread it on a baking sheet and bake at 350°F for 3–5 minutes, stirring once, until golden brown. Watch carefully—it burns quickly.
Preparation Method: Step-by-Step to Creamy, Flavorful Perfection
Now, we move from ingredient appreciation to action. Follow these instructions carefully, and you will be rewarded with perfect Coconut Chicken and Rice. The total active time is approximately 30–35 minutes.
Step 1: Season the Chicken (5 minutes)
Action: Pat 4 boneless, skinless chicken breasts (or thighs) dry with paper towels. Removing surface moisture helps the spices adhere and promotes better browning.
In a small bowl, combine the spice rub:
- 1 teaspoon ground cumin
- 1 teaspoon ground coriander
- 1 teaspoon garlic powder
- 1 teaspoon onion powder
- ½ teaspoon paprika
- Salt and pepper to taste (about ½ teaspoon salt and ¼ teaspoon pepper)
Rub the spice mixture evenly over both sides of each chicken breast. Drizzle 1 tablespoon of fresh lime juice over the seasoned chicken.
Why this matters: Patting the chicken dry removes moisture that would otherwise create steam in the skillet, preventing browning. The spice rub adheres better to dry chicken. The lime juice adds brightness and helps the spices penetrate the meat slightly.
Pro Tip: If you have time, let the seasoned chicken sit at room temperature for 10–15 minutes before cooking. This allows the spices to bloom and takes the chill off the meat, promoting more even cooking.
Step 2: Cook the Chicken (12–14 minutes)
Action: Place a large skillet (12-inch) over medium-high heat. Add 1 tablespoon of olive oil. Once the oil is shimmering (hot but not smoking), add the chicken breasts in a single layer. Do not overcrowd; if necessary, cook in two batches.
Cook the chicken for 6–7 minutes on the first side without moving it. This allows a golden-brown crust to form. Flip the chicken and cook for another 6–7 minutes on the second side, until the chicken is fully cooked. The chicken is done when:
- An instant-read thermometer inserted into the thickest part reads 165°F (74°C) .
- The juices run clear when the chicken is pierced with a knife.
- The exterior is golden brown and slightly crispy.
Remove the chicken from the skillet and set it aside on a plate. Do not wipe out the skillet—the browned bits (fond) are flavor gold.
Why this matters: Searing the chicken undisturbed creates the Maillard reaction—the chemical process that produces deep, savory, caramelized flavor. Cooking the chicken first allows it to rest while you make the rice, and the fond left behind will be incorporated into the rice for extra flavor.
Pro Tip: If your chicken breasts are very thick, reduce the heat to medium after flipping to ensure the center cooks through without burning the outside. If using chicken thighs, they may need an additional 1–2 minutes per side.
Step 3: Sauté the Aromatics (3–4 minutes)
Action: In the same skillet (with the fond still present), add 1 tablespoon of coconut oil. Heat over medium heat until melted.
Add 1 small onion, diced. Sauté for 2–3 minutes, stirring occasionally, until the onion becomes soft and translucent.
Add 2 cloves of minced garlic and 1 teaspoon of grated fresh ginger (optional) . Sauté for an additional 30–60 seconds, stirring constantly, until fragrant. Do not let the garlic brown or burn.
Why this matters: Sautéing the aromatics in the same pan after cooking the chicken allows them to absorb the savory fond. The onion provides sweetness and depth, while the garlic and ginger add pungent, aromatic warmth. This step builds layers of flavor that will permeate the entire dish.
Pro Tip: If the pan seems dry, add a splash of water or broth (about 2 tablespoons) to help loosen the fond and prevent the garlic from burning.
Step 4: Toast the Rice (1–2 minutes)
Action: Add 1 cup of long-grain white rice to the skillet with the aromatics. Stir constantly for 1–2 minutes, until the rice is lightly toasted and fragrant. The rice will change color slightly, becoming a shade or two darker, and will smell nutty.
Why this matters: Toasting the rice before adding liquid is a classic technique (used in pilafs and risottos). It adds a nutty, toasty flavor that you do not get from simply boiling the rice. It also helps the rice maintain its shape and texture, preventing it from becoming mushy.
Pro Tip: Keep a close eye on the rice during this step. It can go from toasted to burnt in seconds. Stir constantly and remove from heat immediately if it starts to darken too quickly.
Step 5: Add Liquids and Simmer the Rice (18–20 minutes)
Action: Pour into the skillet:
- 1 ½ cups coconut milk (shake the can well before opening)
- 1 ½ cups water or chicken broth
Add salt to taste (start with ½ teaspoon). Stir everything together, scraping the bottom of the pan to release any remaining fond. Bring the mixture to a gentle simmer.
Once simmering, cover the skillet with a lid, reduce the heat to low, and cook for 15–18 minutes. Do not lift the lid during this time. The rice is done when:
- The liquid is fully absorbed.
- The rice is tender and fluffy.
- Small holes (crater-like) appear on the surface of the rice.
After 15–18 minutes, remove the skillet from the heat. Let the rice sit, covered, for 5 minutes. This allows the steam to finish cooking the rice and helps it become fluffy. After 5 minutes, fluff the rice with a fork.
Why this matters: Cooking the rice covered over low heat traps steam, which cooks the rice evenly. The 5-minute rest allows the starches to set and the grains to separate. Fluffing with a fork (rather than a spoon) prevents the rice from becoming mushy or clumpy.
Pro Tip: If the rice is still firm after 18 minutes and the liquid is absorbed, add 2–3 tablespoons of water, cover, and cook for an additional 2–3 minutes. If the rice is tender but there is excess liquid, remove the lid and simmer for 1–2 minutes to evaporate.
Step 6: Slice the Chicken (2 minutes)
Action: While the rice is resting, slice the cooked chicken. Place each chicken breast on a cutting board and slice it against the grain (perpendicular to the direction of the muscle fibers) into ½-inch thick strips.
Why this matters: Slicing against the grain shortens the muscle fibers, ensuring tender, easy-to-chew pieces. If you slice with the grain, the chicken will be stringy and tough. Slicing just before serving preserves the juices.
Pro Tip: Let the chicken rest for 5–10 minutes before slicing. This allows the juices to redistribute throughout the meat; if you slice immediately, the juices will run out onto the cutting board.
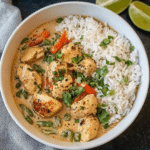
Step 7: Assemble and Garnish (2 minutes)
Action: Spoon the coconut rice onto a serving platter or into individual bowls. Arrange the sliced chicken on top of the rice. Garnish with:
- Fresh cilantro or parsley, chopped
- Lime wedges
- Toasted shredded coconut (optional)
Serve immediately, with extra lime wedges on the side for squeezing over individual portions.
Why this matters: The fresh garnishes add color, brightness, and contrasting textures. The lime juice cuts through the richness of the coconut, while the herbs add freshness. Toasted coconut adds crunch and an extra layer of coconut flavor.
Pro Tip: For a beautiful presentation, sprinkle the garnishes over the dish just before serving. If you are serving family-style, let everyone add their own lime juice and herbs at the table.
Conclusion: A Dish That Transports You
Coconut Chicken and Rice is the kind of recipe that earns a permanent place in your cooking rotation. It is creamy, fragrant, and deeply satisfying, yet it comes together in about 30 minutes with minimal cleanup. The warm, earthy spices on the chicken complement the sweet, luxurious coconut rice perfectly, while the lime and fresh herbs add brightness and balance.
This dish is a reminder that you do not need complicated techniques or hard-to-find ingredients to create something extraordinary. With a handful of spices, a can of coconut milk, and a single skillet, you can transport yourself—and everyone at your table—to a place where dinner is always delicious, comforting, and memorable.
So season that chicken, toast that rice, and simmer that coconut milk. Your new favorite one-skillet meal is waiting.
Frequently Asked Questions (FAQ)
1. Can I use chicken thighs instead of chicken breasts?
Absolutely. Boneless, skinless chicken thighs are an excellent substitute. They are more forgiving than breasts (harder to overcook) and have a richer, juicier flavor. Follow the same seasoning and cooking instructions. Thighs may take 1–2 minutes longer per side because of their higher fat content. The internal temperature should still reach 165°F (74°C).
2. Can I use brown rice instead of white rice?
Yes, but you will need to adjust the liquid and cooking time. Brown rice requires more liquid and a longer cooking time than white rice. Use 1 cup brown rice, 2 cups coconut milk, and 1 cup water/broth (total 3 cups liquid). Simmer covered for 35–40 minutes, then let rest for 10 minutes before fluffing. The texture will be chewier and nuttier, which many people enjoy.
3. Can I use light coconut milk instead of full-fat?
You can, but the result will be less creamy and flavorful. Light coconut milk contains less fat and more water, resulting in thinner, less luxurious rice. If using light coconut milk, consider adding 1 tablespoon of coconut oil or butter to the rice to compensate for the missing fat. The flavor will still be good, but it will not be as rich.
4. Is this recipe dairy-free?
Yes, as written, this recipe is completely dairy-free. Coconut milk, coconut oil, and all other ingredients contain no dairy. If you substitute chicken broth, ensure it is dairy-free (most are). If you garnish with butter or cheese (not in the recipe), that would add dairy, but the core recipe is dairy-free.
5. Can I make this recipe in one pan?
Yes. The recipe as written uses one skillet for the chicken and the rice (the chicken is removed, then the rice is cooked in the same skillet). This is a one-pan meal. If your skillet is not large enough to hold the rice and all the liquid, you can transfer the rice mixture to a saucepan, but the recipe is designed to be made entirely in a large skillet.
6. How do I store and reheat leftovers?
Store leftovers in an airtight container in the refrigerator for up to 3 days. To reheat, the stovetop is best: place leftovers in a skillet over medium-low heat with a splash of water or broth, and stir gently until heated through. The microwave works: place a portion in a microwave-safe bowl, cover loosely, and heat in 45-second intervals on medium power, stirring between intervals. The rice may absorb more liquid as it sits, so leftovers will be thicker and less saucy—add a splash of liquid when reheating.
7. Can I freeze this dish?
Yes, but with some texture changes. The chicken freezes well, but the coconut rice may become slightly mushy upon thawing. To freeze: store chicken and rice together in a freezer-safe container for up to 2 months. Thaw overnight in the refrigerator. Reheat gently on the stovetop with a splash of coconut milk or broth to restore creaminess. For best results, freeze the chicken and rice separately.
8. Can I add vegetables to this dish?
Yes. Vegetables are a great addition. Add them during the aromatics step (after sautéing the onion). Good options include: bell peppers (diced), carrots (diced), peas (frozen, add at the end), spinach (stir in after cooking the rice, letting residual heat wilt it), or broccoli (small florets, add with the rice and liquid). If adding vegetables, you may need to increase the liquid slightly (add ¼ cup of water or broth).
9. Why is my rice mushy or sticky?
Mushy rice is usually caused by too much liquid or overcooking. Ensure you are using the correct ratio: 1 cup rice to 3 cups total liquid (1.5 cups coconut milk + 1.5 cups water/broth). Also, do not stir the rice while it is cooking—stirring releases starch and makes it sticky. Finally, let the rice rest for 5 minutes after cooking before fluffing. If the rice is still mushy, reduce the liquid by ¼ cup next time.
10. Can I use coconut cream instead of coconut milk?
Coconut cream is thicker and richer than coconut milk (less water, more fat). If you use coconut cream, dilute it with water: use 1 cup coconut cream + 2 cups water (or broth) to approximate the consistency of coconut milk. Do not use undiluted coconut cream, as the rice will be excessively rich and may become gluey.
11. Can I make this recipe spicy?
Yes. To add heat, add ½–1 teaspoon of red pepper flakes or ¼–½ teaspoon of cayenne pepper to the spice rub for the chicken. You can also add 1 teaspoon of sriracha or chili garlic sauce to the rice liquid, or garnish with fresh sliced chilies (like Thai bird chilies or serranos). A drizzle of chili oil over the finished dish also adds heat and flavor.
12. Can I use a different protein instead of chicken?
Absolutely. This recipe works beautifully with shrimp (add to the skillet after the rice is cooked; cook for 2–3 minutes until pink), tofu (press, cube, and pan-fry before making the rice), salmon (sear as directed for chicken), or pork chops (season and sear as directed). Adjust cooking times based on the protein.
13. Why do I need to shake the can of coconut milk?
Coconut milk separates in the can, with thick coconut cream rising to the top and watery liquid settling at the bottom. Shaking the can vigorously before opening recombines the cream and liquid, ensuring a consistent, creamy texture throughout the rice. If you forget to shake, you may end up with unevenly cooked rice—some parts too rich, others too thin.
14. Can I prepare this dish ahead of time for a dinner party?
This dish is best served fresh, but you can prep components in advance. Up to 24 hours ahead: season the chicken (store covered in the refrigerator), dice the onion, mince the garlic, grate the ginger, and measure the rice, coconut milk, and broth. When ready to serve, cook as directed. If you must make the full dish ahead, undercook the rice slightly (by 2–3 minutes) and add an extra ¼ cup of liquid when reheating.
15. What should I serve with this dish?
Coconut Chicken and Rice is a complete meal on its own, but it pairs beautifully with simple sides. A cucumber salad (sliced cucumbers with rice vinegar, salt, and a pinch of sugar) adds refreshing crunch. Roasted vegetables (broccoli, asparagus, or green beans) add color and nutrition. Fresh mango slices or a mango salsa complement the coconut and lime beautifully. A crisp white wine (like Sauvignon Blanc or Pinot Grigio) or a light beer is an excellent beverage pairing.
Coconut Chicken and Rice: A Complete Guide to a Creamy, Flavorful Classic
Creamy coconut chicken and rice made with warm spices, fragrant coconut rice, and juicy pan-seared chicken for a rich and comforting meal.
- Prep Time: 15 minutes
- Cook Time: 30 minutes
- Total Time: 45 minutes
- Yield: 4 servings
- Category: Main Dish, Dinner
- Method: Stovetop
- Cuisine: Tropical Fusion
Ingredients
- 4 boneless, skinless chicken breasts
- 1 tbsp olive oil
- 1 tsp ground cumin
- 1 tsp ground coriander
- 1 tsp garlic powder
- 1 tsp onion powder
- 1/2 tsp paprika
- Salt and black pepper to taste
- 1 tbsp fresh lime juice
- 1 cup long-grain white rice
- 1 1/2 cups coconut milk
- 1 1/2 cups water or chicken broth
- 1 tbsp coconut oil
- 1 small onion, diced
- 2 cloves garlic, minced
- 1 tsp grated fresh ginger (optional)
- Salt to taste
- Fresh cilantro or parsley (for garnish)
- Lime wedges (for serving)
- Toasted shredded coconut (optional)
Instructions
- Mix cumin, coriander, garlic powder, onion powder, paprika, salt, and pepper. Rub onto chicken and add lime juice.
- Heat olive oil in a skillet and cook chicken 6–7 minutes per side until fully cooked. Remove and set aside.
- In same pan, heat coconut oil and sauté onion until soft.
- Add garlic and ginger and cook until fragrant.
- Stir in rice and toast lightly for 1–2 minutes.
- Pour in coconut milk and water or broth, then bring to a simmer.
- Cover and cook on low for 15–18 minutes until rice is tender.
- Let rest 5 minutes, then fluff with a fork.
- Slice chicken and serve over rice.
- Garnish with herbs, lime, and toasted coconut.
Notes
- Use chicken thighs for extra juiciness.
- Don’t skip resting the rice for best texture.
- Add chili flakes for a spicy version.