
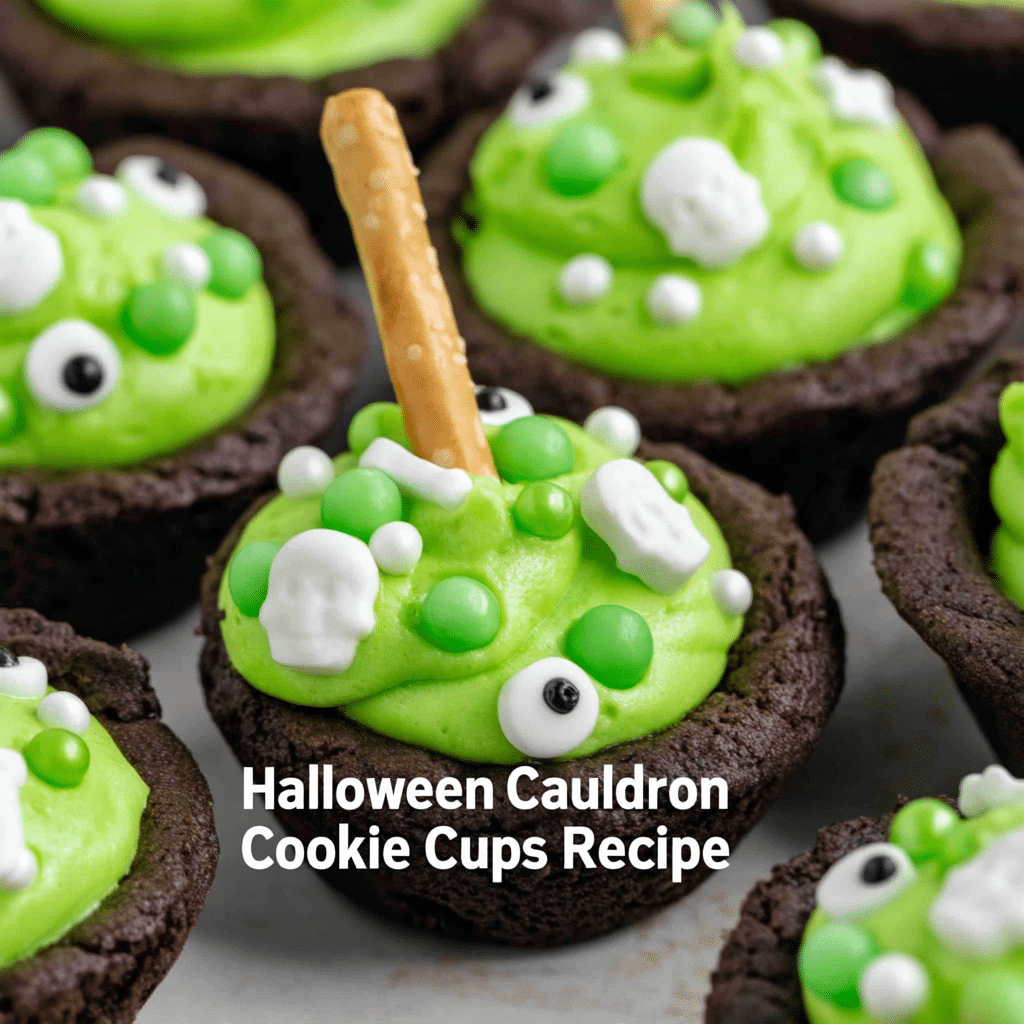
Halloween is the perfect time of year to have a little fun in the kitchen, and these Halloween Cauldron Cookie Cups are an especially delightful way to celebrate. They combine rich chocolate cookie cups with vibrant green buttercream and playful Halloween decorations to create a dessert that looks like a collection of tiny bubbling cauldrons. Each cookie cup is easy to hold, easy to decorate, and packed with the chocolate flavor that makes them irresistible.
What makes this recipe particularly appealing is that the cookie cups start with a convenient box of Devil’s Food cake mix. Instead of making a traditional cookie dough from scratch, the cake mix is combined with eggs, canola or vegetable oil, and optional black food coloring to create a soft, rich dough. Once baked in mini muffin pans, the warm cookies are shaped into little cups with a simple measuring spoon. The result is a sturdy chocolate shell with a small indentation in the center, ready to be filled with colorful buttercream.
The green buttercream is where the cauldron effect really comes to life. A smooth mixture of softened butter, powdered sugar, vanilla extract, salt, milk, and green food coloring creates a bright green frosting that can be piped generously into every cookie cup. Green sprinkles, Halloween sprinkles, candy eyeballs, and pretzel sticks complete the decoration, giving each little dessert its own personality.
These cookie cups are especially suitable for Halloween parties because they can be prepared ahead of time. The undecorated cookie cups can be frozen for up to three months, while the buttercream can be prepared the night before. This makes the recipe practical for parties, school celebrations, family gatherings, bake sales, or simply a fun Halloween baking project at home.
Whether you are an experienced baker or looking for a simple Halloween dessert that looks impressive without requiring complicated techniques, these Cauldron Cookie Cups are a wonderful choice. The process is straightforward, the decorations are flexible, and the finished treats are both festive and delicious.
Why You’ll Love These Halloween Cauldron Cookie Cups
There are several reasons these little chocolate desserts are so much fun to make and serve.
First, they have a dramatic Halloween appearance without requiring advanced decorating skills. The green buttercream immediately creates the illusion of bubbling potion, while candy eyeballs and colorful sprinkles make every cookie cup look playful and mysterious.
Second, the cookie cups are made with a boxed Devil’s Food cake mix. This keeps the preparation simple while still producing a rich chocolate base. You do not need to measure several different dry ingredients or prepare a complicated dough. The cake mix provides the foundation, while eggs and oil transform it into a workable cookie dough.
The recipe is also easy to customize visually. You can make the buttercream a lighter or darker shade of green depending on the Halloween theme you want. The decorations can be arranged differently on every cookie cup, which makes this recipe particularly enjoyable for children who want to help decorate.
Another advantage is that the cookie cups can be prepared in advance. Because the undecorated cups can be frozen, you can bake them well before Halloween and decorate them closer to serving time. This can make party preparation much less stressful.
Most importantly, the finished dessert offers a combination of textures. The chocolate cookie cup provides a soft, rich base, while the buttercream adds a smooth and creamy element. The sprinkles and candy eyeballs provide additional texture, and the pretzel stick acts as an adorable edible stir stick.
Ingredients for Halloween Cauldron Cookie Cups
This recipe is divided into three simple components: the chocolate cookie cups, the green buttercream, and the decorations.
Chocolate Cookie Cups
- 1 (15.25 ounce) box Devil’s Food cake mix I used Duncan Hines
- 2 large eggs
- 1/2 cup canola or vegetable oil
- black food coloring, optional
The Devil’s Food cake mix creates the rich chocolate foundation for these cookie cups. The recipe was tested with a 15.25-ounce box of Duncan Hines Devil’s Food cake mix. If you use a smaller 13.25-ounce box, reduce the oil to 1/3 cup.
The eggs help bind the dough together, while the canola or vegetable oil contributes moisture and a tender texture. Black food coloring is optional, but it can deepen the appearance of the chocolate cookie cups and make the finished cauldrons look even more dramatic.
Green Buttercream
- 1 cup unsalted butter, softened
- 3 cups powdered sugar
- 1 teaspoon vanilla extract
- 1/2 teaspoon salt
- 1-3 tablespoons milk
- green food coloring
The buttercream is designed to be smooth enough for piping but thick enough to hold its shape. Softened butter is important because it allows the frosting to become creamy when beaten. Powdered sugar provides sweetness and structure, while vanilla extract gives the buttercream a pleasant flavor. The small amount of salt helps balance the sweetness.
The milk should be added gradually. Depending on the consistency of your buttercream and the softness of your butter, you may need only a small amount. Start with 1 tablespoon and add more 1 teaspoon at a time as necessary.
Decorations
- Round green sprinkles, as needed
- Halloween sprinkles, as needed
- Candy eyeballs, as needed
- Pretzel sticks
These decorations create the signature cauldron appearance. You can use as many or as few as you like. The green sprinkles are particularly useful for emphasizing the bubbling-potion effect, while Halloween sprinkles add color and variety. Candy eyeballs make the cookie cups playful, and the pretzel sticks become edible stir sticks.
How to Make Halloween Cauldron Cookie Cups
Step 1: Prepare the Oven and Mini Muffin Pans
Begin by preheating the oven to 350°F. While the oven heats, lightly grease three 12-count mini muffin pans.
Preparing the pans before making the dough is helpful because the cookie mixture comes together quickly. Lightly greasing the pans makes it easier to remove the baked cookie cups after they have cooled.
Three 12-count mini muffin pans provide 36 mini muffin spaces, making them suitable for creating a large batch of small cookie cups.
Step 2: Make the Chocolate Cookie Dough
Add the Devil’s Food cake mix, eggs, and canola or vegetable oil to a large bowl. If you are using black food coloring, add it at this stage as well.
Mix the ingredients until they are well combined and form a cohesive dough. The mixture should be thick enough to scoop and press into the mini muffin pans.
Because the recipe uses cake mix rather than traditional flour-based cookie ingredients, the dough comes together quickly. Avoid overcomplicating this step. Once the ingredients are evenly combined, the dough is ready to portion.
If you are using black food coloring, mix it thoroughly so the color is distributed throughout the dough. The coloring is optional, so the recipe can be made without it if you prefer the natural dark chocolate appearance of the Devil’s Food cake mix.
Step 3: Portion the Dough
Scoop approximately 1/2 tablespoon of dough and place it into each cavity of the prepared mini muffin pans.
Once the dough is in place, flatten it gently with your fingers. Try to distribute the dough evenly so the cookie cups bake at approximately the same rate.
Keeping the portions consistent is useful because smaller or larger pieces can bake at different speeds. A consistent amount of dough also helps create cookie cups with similar sizes and shapes, which makes the final presentation more polished.
There is no need to create the indentation before baking. The center will be shaped immediately after the cookie cups come out of the oven.
Step 4: Bake the Cookie Cups
Place the filled mini muffin pans in the preheated oven and bake for 8 to 10 minutes, or until the edges are set.
Keep an eye on the cookies toward the end of the baking time. The goal is for the edges to become set while the cookies remain soft enough in the center to be shaped.
The timing may vary slightly depending on your oven and the exact size of your cookie portions. Avoid relying solely on color because the chocolate dough is naturally dark. Instead, look at the edges and overall structure of the cookies.
Step 5: Create the Cauldron Indentations
This is one of the most important steps in the recipe.
Immediately after removing the cookie cups from the oven, press the back of a 1-tablespoon measuring spoon into the center of each warm cookie.
The pressure creates an indentation that transforms each baked cookie from a simple round piece into a small cup. The indentation will later hold the green buttercream.
It is important to perform this step while the cookies are still warm. As the cookies cool, they become firmer and more difficult to shape. Waiting too long can make it harder to create a deep, clean indentation.
Press carefully rather than aggressively. You want to create a defined cavity without pressing all the way through the cookie.
Step 6: Cool the Cookie Cups Completely
Allow the cookie cups to cool completely in the pans before carefully removing them.
Cooling is important because warm cookie cups are more delicate. Removing them too early may cause them to break or lose their shape.
Once completely cool, gently loosen each cookie cup from the pan. Handle them carefully, especially around the edges and the indentation.
At this stage, you should have small chocolate cookie cups ready to be filled and decorated.
How to Make the Green Buttercream
Step 1: Beat the Butter
Place the softened unsalted butter in a medium bowl. Beat it until it becomes creamy.
Using softened rather than cold butter helps the frosting become smooth more easily. The butter should be soft enough to mix but should not be melted.
Beating the butter first also creates a good base for incorporating the powdered sugar.
Step 2: Add the Powdered Sugar
Gradually add the powdered sugar while continuing to beat the mixture.
Adding the powdered sugar gradually helps prevent a large cloud of sugar from escaping the bowl and makes it easier to achieve an even consistency.
Continue beating until the mixture becomes smooth. At this point, the buttercream will begin to take shape, although it may still be fairly thick.
Step 3: Add Vanilla and Salt
Add the vanilla extract and salt, then continue mixing.
Vanilla extract provides a familiar sweet flavor that complements the chocolate cookie cups. The salt helps balance the sweetness of the powdered sugar and gives the buttercream a more rounded flavor.
Mix until the ingredients are evenly incorporated.
Step 4: Adjust the Consistency with Milk
Add 1 tablespoon of milk and mix.
Check the consistency before adding more. If the buttercream is still too thick to pipe comfortably, add more milk 1 teaspoon at a time.
The goal is a smooth buttercream that is easy to pipe into the cookie cups without becoming so loose that it loses its shape.
Small adjustments are better than adding too much milk at once. Once the frosting becomes too thin, additional powdered sugar may be needed to thicken it again.
Step 5: Add the Green Food Coloring
Mix in the green food coloring until the buttercream reaches your desired shade.
You can choose a bright green for a classic Halloween potion appearance or adjust the amount to create a deeper green effect.
Mix thoroughly so the color is evenly distributed throughout the buttercream.
How to Assemble the Halloween Cauldron Cookie Cups
Once the cookie cups have completely cooled and the buttercream is ready, you can begin decorating.
Transfer the green buttercream to a piping bag or another suitable piping setup. Pipe the buttercream into the center of each chocolate cookie cup.
Fill the cavity generously so that the frosting resembles a bubbling potion inside a tiny cauldron.
The buttercream does not need to be perfectly smooth. In fact, a slightly uneven or textured surface can make the potion effect more convincing. The decorations will cover some of the surface and create additional visual interest.
Next, add round green sprinkles and Halloween sprinkles as desired. Scatter them over the buttercream so they look like colorful ingredients floating in the potion.
Add candy eyeballs to give the cauldrons a playful Halloween character. You can place one or several candy eyeballs on each cookie cup depending on the look you want.
Finally, break the pretzel sticks in half and insert one piece into each cookie cup as a stir stick.
The pretzel sticks are a particularly fun finishing touch because they make the cookie cups resemble miniature bubbling cauldrons being stirred by tiny witches.
Tips for Successful Halloween Cauldron Cookie Cups
Use the Correct Cake Mix Size
The recipe was tested with a 15.25-ounce box of Duncan Hines Devil’s Food cake mix. If you use a smaller 13.25-ounce box, reduce the oil to 1/3 cup.
This adjustment is important because changing the amount of cake mix without changing the liquid ingredients can affect the dough’s consistency.
Shape the Cookies Immediately
Do not wait for the cookies to cool before making the indentations.
The warm cookies are flexible and easy to shape. Once they cool, they become firmer and more difficult to press into a cup shape.
Have your 1-tablespoon measuring spoon ready before the cookies come out of the oven so you can work efficiently.
Do Not Overfill the Muffin Pans
Use approximately 1/2 tablespoon of dough for each cookie cup. Keeping the portions consistent helps the cookies bake evenly and creates similarly sized cups.
Let the Cookie Cups Cool Completely
Although it is tempting to decorate the cookies while they are still warm, allow them to cool completely first.
If buttercream is added to warm cookies, it can soften or melt, making the frosting difficult to pipe and potentially affecting the final appearance.
Add Milk Slowly to the Buttercream
Buttercream consistency is easier to control when the milk is added gradually.
Start with 1 tablespoon and then add more 1 teaspoon at a time. This gives you better control over how thick or soft the frosting becomes.
Make the Buttercream Ahead
The buttercream can be made the night before and refrigerated.
Before using it, allow it to soften slightly and then give it a good stir. This helps restore a smooth, workable texture for piping.
Have Fun with the Decorations
The decorations are intentionally flexible. Use the green sprinkles, Halloween sprinkles, candy eyeballs, and pretzel sticks according to the appearance you want.
Because the cookie cups are small, even a modest amount of decoration can make a significant visual difference.
Make-Ahead and Storage Instructions
These Halloween Cauldron Cookie Cups are convenient for preparing ahead of time.
The decorated Cauldron Cookies can be stored in an airtight container at room temperature for 3 to 4 days. If you prefer to refrigerate them, they can be kept in the refrigerator for up to one week.
Keep the cookies protected in an airtight container to help maintain their texture and prevent them from absorbing unwanted odors or moisture.
For longer-term preparation, the undecorated cookie cups can be frozen for up to 3 months.
When you are ready to use frozen cookie cups, thaw them at room temperature before adding the buttercream and decorations. Decorating after thawing helps preserve the intended appearance and texture of the frosting.
The buttercream itself can also be prepared the night before. Refrigerate it, then allow it to soften slightly before stirring and piping.
For the best presentation, consider preparing the cookie cups in advance and decorating them closer to the time you plan to serve them.
Serving Ideas
Halloween Cauldron Cookie Cups are naturally suited to Halloween parties, but there are plenty of occasions where they can be served.
Place them on a large serving platter for a Halloween dessert table. Arranging the cookie cups together makes the green buttercream and colorful decorations stand out.
They can also be individually served at a Halloween dinner or family gathering. Because they are small, they make convenient individual portions and are easy for guests to pick up.
For a children’s Halloween party, decorating the cookie cups can become part of the activity. Prepare the cookie cups and buttercream ahead of time, then allow children to add sprinkles, candy eyeballs, and pretzel stir sticks under appropriate supervision.
They can also be included in a larger selection of Halloween treats. Their small size makes them easy to combine with other desserts without overwhelming the dessert table.
Understanding the Texture and Flavor
The chocolate cookie cups provide a rich and tender foundation. The Devil’s Food cake mix contributes a deep chocolate character, while the eggs and oil help create a soft cookie texture.
The green buttercream provides a contrasting creamy texture. Its sweetness pairs naturally with the chocolate cookie base, while vanilla and salt add balance.
The decorations provide visual variety and small textural contrasts. Sprinkles add a light crunch, candy eyeballs add a fun decorative element, and the pretzel stick contributes a salty, crisp bite.
Together, these components create a dessert that is not only visually themed but also balanced in texture. The small cookie-cup format means that each bite contains a combination of chocolate cookie, creamy buttercream, and Halloween decorations.
Nutrition Information
According to the provided nutrition information, each serving contains approximately:
- Calories: 168 kcal
- Carbohydrates: 19g
- Protein: 1g
- Fat: 10g
- Saturated Fat: 4g
- Polyunsaturated Fat: 3g
- Monounsaturated Fat: 3g
- Trans Fat: 0.2g
- Cholesterol: 24mg
- Sodium: 140mg
- Potassium: 47mg
- Fiber: 0.3g
- Sugar: 14g
- Vitamin A: 174 IU
- Vitamin C: 0.01mg
- Calcium: 22mg
- Iron: 1mg
Nutrition values can vary depending on the specific cake mix, decorations, serving size, and ingredients used.
Frequently Asked Questions
Can I make these Cauldron Cookie Cups without black food coloring?
Yes. Black food coloring is optional. The Devil’s Food cake mix already produces a dark chocolate cookie, so the recipe will still have a Halloween-appropriate appearance without the additional coloring.
The black food coloring simply gives the chocolate cups an even darker appearance, which can make the cauldron theme more dramatic.
What if I use a 13.25-ounce box of cake mix?
If you use a smaller 13.25-ounce box of Devil’s Food cake mix, reduce the oil to 1/3 cup.
The original recipe was tested with a 15.25-ounce box of Duncan Hines Devil’s Food cake mix, so adjusting the oil helps account for the difference in cake mix quantity.
Why do I need to press the cookies while they are warm?
The warm cookies are still soft enough to shape. Pressing the back of a 1-tablespoon measuring spoon into the center creates the cavity needed for the buttercream.
If you wait until the cookies have cooled, they become firmer and harder to shape. For this reason, make the indentations immediately after removing the cookies from the oven.
Can I make the cookie cups ahead of time?
Yes. The undecorated cookie cups can be frozen for up to 3 months.
Allow them to thaw at room temperature before decorating them with the buttercream and Halloween decorations.
Can I prepare the buttercream in advance?
Yes. The buttercream can be made the night before and refrigerated.
Before piping, allow it to soften slightly and give it a good stir. This helps bring the buttercream back to a smooth consistency.
How should I store the finished cookie cups?
Store the decorated Cauldron Cookies in an airtight container at room temperature for 3 to 4 days or in the refrigerator for up to one week.
Keeping them covered helps maintain their quality and protects the decorations.
How do I keep the buttercream from becoming too thin?
Add the milk gradually rather than all at once. Begin with 1 tablespoon, then add more 1 teaspoon at a time as needed.
The goal is a buttercream that is smooth and easy to pipe while still thick enough to hold its shape.
Can children help make these cookies?
Yes. These cookie cups are particularly fun as a Halloween baking activity. Children can help with decorating by adding sprinkles and candy eyeballs once the cookie cups have cooled and the buttercream has been piped.
Adult supervision is appropriate when working with the hot oven, warm baking pans, and other kitchen equipment.
Can I change the amount of Halloween decorations?
Yes. The round green sprinkles, Halloween sprinkles, and candy eyeballs are all listed as needed, so you can use the amount that suits your desired presentation.
You can make each cookie cup look slightly different or decorate them all in a similar style.
Why are the pretzel sticks used?
The pretzel sticks are used as edible stir sticks. Once broken in half and inserted into the buttercream, they help make the cookie cups resemble tiny cauldrons filled with bubbling potion.
They also add a little salty crunch to the dessert.
Final Thoughts
Halloween Cauldron Cookie Cups are a creative and approachable dessert that turns simple chocolate cookie cups into festive miniature cauldrons. The combination of Devil’s Food cake mix, eggs, canola or vegetable oil, and optional black food coloring creates the chocolate base, while homemade green buttercream provides the colorful potion-like filling.
The key to getting the best results is paying attention to timing. Shape the cookie cups immediately after they come out of the oven, allow them to cool completely before decorating, and add the milk gradually when preparing the buttercream. These small steps help produce cookie cups that are easy to fill and decorate.
The decorations are where the recipe becomes especially playful. Green sprinkles, Halloween sprinkles, candy eyeballs, and pretzel sticks transform the simple chocolate cups into miniature Halloween creations. Because the decorating process is flexible, every cookie cup can have its own personality.
The recipe is also practical for entertaining because the undecorated cookie cups can be frozen for up to three months, while the buttercream can be prepared the night before. Whether you are preparing treats for a Halloween party, a family gathering, a school celebration, or a festive dessert table, these cookie cups can be made ahead and decorated when needed.
With their rich chocolate base, creamy green frosting, colorful decorations, and charming pretzel stir sticks, Halloween Cauldron Cookie Cups are a memorable way to bring a little magic to your Halloween celebration.