
The evolution of the modern home kitchen has been defined by a shift toward efficiency without the sacrifice of flavor. In this landscape, the one-pan dinner has emerged not merely as a convenience but as a culinary art form. Among the various profiles that have captured the imagination of home cooks and professional chefs alike, the Pepperoncini Chicken Skillet stands as a testament to the power of balance. It is a dish that marries the sharp, acidic bite of pickled peppers with the luxurious, rounding texture of heavy cream, all anchored by perfectly seared protein. This article provides an exhaustive exploration of this recipe, moving beyond the basic steps to understand the “why” behind every ingredient and technique, ensuring that your final result is nothing short of restaurant quality.
The Philosophy of the One-Pan Meal
Before we look at the specific ingredients, it is essential to understand the structural benefits of the skillet method. When you cook a meal in a single pan, you are engaging in a process of flavor layering. Each stage of the process—from searing the chicken to sautéing the aromatics—leaves behind a physical record of flavor known as the “fond.” These are the browned bits stuck to the bottom of the pan that contain concentrated proteins and sugars. In a one-pan Pepperoncini Chicken Skillet, we utilize the acidity of the pepper juice to deglaze these bits, integrating them back into the sauce. This creates a depth of flavor that is impossible to achieve if the components are cooked separately.
Ingredient Breakdown and Selection
To achieve the best results, every component must be chosen with intention. While the ingredients are accessible, the quality of your selection will dictate the complexity of the final sauce.
The Protein Selection
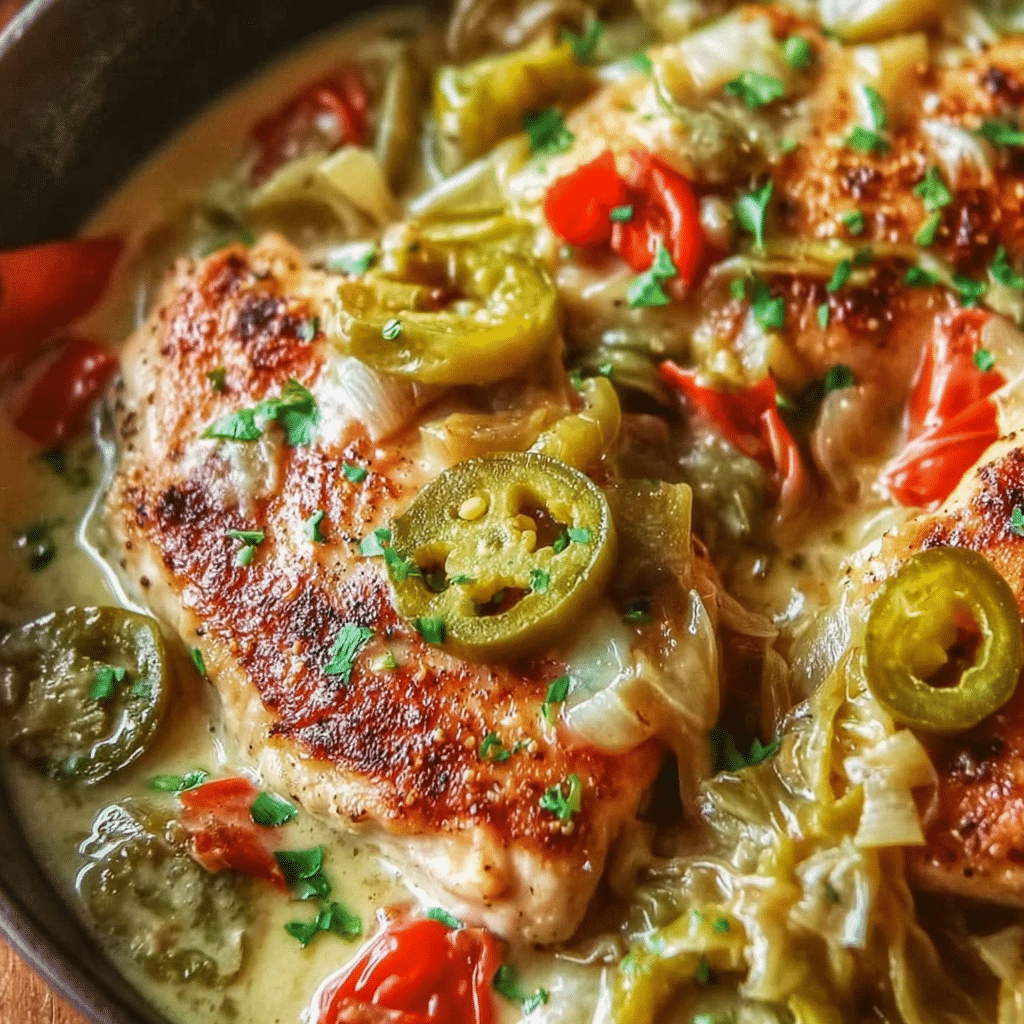
For this recipe, we utilize 1.5 lbs of boneless, skinless chicken breasts, cut into 1-inch cubes. The choice of breast meat provides a lean, clean canvas that allows the bright acidity of the pepperoncini to shine. Cutting the chicken into uniform cubes is not just for aesthetics; it increases the surface area available for browning. This browning, or the Maillard reaction, is what provides the savory counterpoint to the creamy sauce. If you prefer a juicier result, boneless chicken thighs can be substituted using the same measurements, though they may require an additional two minutes of initial searing.
The Role of Pepperoncini Peppers
The 16 oz jar of pepperoncini peppers is the soul of this dish. These mild, pickled peppers provide three distinct elements: heat, crunch, and acidity. By draining the peppers but reserving 1/4 cup of the brine, we gain a powerful seasoning tool. The brine acts as a liquid salt and acid, cutting through the richness of the heavy cream that will be added later. Chopping the peppers ensures that their piquant flavor is distributed evenly in every bite, rather than coming in large, overwhelming bursts.
Aromatics and Fat
A medium yellow onion and four cloves of fresh minced garlic provide the foundational sweetness and earthiness. Yellow onions are preferred here for their high sugar content, which caramelizes beautifully against the acidic peppers. The use of two tablespoons of extra virgin olive oil provides a stable medium for high-heat searing while contributing its own fruity undertones to the base of the skillet.
The Liquid Base and Emulsification
The combination of 1/2 cup low-sodium chicken broth and 1/2 cup heavy cream creates a velouté-style sauce that is both light and indulgent. Using low-sodium broth is a strategic choice; since the pepperoncini brine is naturally high in salt, starting with a low-sodium base gives you total control over the final seasoning. The heavy cream serves as the emulsifier, binding the chicken juices and the acidic brine into a cohesive, velvety sauce that coats the back of a spoon.
Essential Seasoning and Garnish
The seasoning profile is decidedly Mediterranean. One tablespoon of Italian seasoning—typically a blend of oregano, thyme, rosemary, and basil—provides an herbal backbone. The addition of 1/4 teaspoon of red pepper flakes allows you to customize the “creep” of the heat. While the pepperoncinis are mild, the flakes add a dry heat that lingers on the palate. Finally, fresh parsley added at the very end provides a “lift,” breaking up the richness of the cream with a burst of chlorophyll and freshness.
Preparation Method: Step-by-Step Excellence
Success in the kitchen is often a matter of timing and temperature management. Follow these detailed steps to ensure your Pepperoncini Chicken Skillet is executed perfectly.
Phase 1: Preparing the Protein
The first mistake many cooks make is placing cold, wet chicken into a hot pan. To avoid this, pat your chicken cubes dry with paper towels. Moisture on the surface of the meat creates steam, which prevents browning. Once dry, season the chicken generously with the 1/2 teaspoon of salt and 1/4 teaspoon of black pepper.
Phase 2: The Initial Sear
Heat your extra virgin olive oil in a large skillet over medium-high heat. You will know the oil is ready when it begins to shimmer. Add the chicken in a single layer. If your skillet isn’t large enough, work in batches. Overcrowding the pan lowers the temperature and leads to gray, boiled meat rather than golden-brown chicken. Cook for 5 to 7 minutes, turning occasionally. Once the chicken is cooked through and has developed a rich crust, remove it from the skillet and set it aside on a plate.
Phase 3: Building the Aromatic Base
Reduce the heat to medium. The pan will now be covered in golden-brown bits. Add the chopped yellow onion. As the onion releases its moisture, it will begin to soften the fond. Sauté for about 5 minutes until the onions are translucent and slightly sweet. Add the four cloves of minced garlic and cook for only 60 seconds. Garlic burns easily, and burnt garlic will impart a bitter flavor that can ruin the entire sauce.
Phase 4: Deglazing and Simmering
This is the most critical flavor-building step. Pour the 1/4 cup of reserved pepperoncini juice into the hot skillet. Use a wooden spoon to scrape the bottom of the pan vigorously. This process, known as deglazing, incorporates all the caramelized chicken juices into the liquid. Next, stir in the chopped pepperoncini peppers, the chicken broth, the Italian seasoning, and the red pepper flakes. Bring the mixture to a gentle simmer and let it cook for 5 minutes. This allows the peppers to soften and the flavors to meld.
Phase 5: The Creamy Finish
Lower the heat slightly and pour in the 1/2 cup of heavy cream. Stir constantly to ensure the cream incorporates smoothly without curdling. Return the cooked chicken and any juices that have collected on the plate back into the skillet. Simmer for an additional 5 minutes. During this time, the sauce will reduce and thicken, and the chicken will finish absorbing the flavors of the sauce.
Phase 6: Final Touches and Serving
Taste the sauce. Because the pepperoncini brine varies in saltiness, you may need a final pinch of salt or a squeeze of lemon if you desire more brightness. Garnish with the fresh chopped parsley. This dish is incredibly versatile; serve it over a bed of al dente pasta to soak up the sauce, or alongside fluffy white rice for a gluten-free comfort meal.
Advanced Tips for Skillet Success
To elevate this dish from a standard weeknight meal to a signature recipe, consider these professional nuances.
Temperature Control and Sauciness
One of the challenges of cream-based sauces is maintaining the right consistency. If you find your sauce has thickened too much during the final simmer, do not add more cream, as this can make the dish overly heavy. Instead, add a tablespoon of chicken broth or even a splash of water to loosen the emulsion. Conversely, if the sauce is too thin, allow it to simmer for an extra two minutes uncovered; the evaporation will naturally concentrate the fats and proteins, creating a thicker coat.
The Importance of Resting the Meat
While it is tempting to serve the chicken immediately after it hits the sauce, allowing the chicken to sit in the simmering cream for those final five minutes is essential. This process allows the muscle fibers of the chicken, which tightened during the high-heat sear, to relax and draw in the moisture of the sauce, resulting in a much more tender bite.
Customizing the Heat Profile
The beauty of the Pepperoncini Chicken Skillet is its adjustable heat. The red pepper flakes provide the “front-end” heat, while the peppers themselves provide a “back-end” tang. If you are cooking for a crowd with sensitive palates, omit the red pepper flakes entirely and ensure you remove the seeds from the pepperoncinis before chopping. If you prefer a spicy kick, increase the flakes to 1/2 teaspoon and include some of the pepper seeds in the skillet.
Conclusion
The Pepperoncini Chicken Skillet is more than just a quick meal; it is a masterclass in utilizing pantry staples to create sophisticated flavor profiles. By understanding the interaction between the acidity of the vinegar-brined peppers and the richness of the heavy cream, you can produce a dish that tastes as though it took hours to prepare, all within the span of thirty minutes. The success of this recipe lies in the details—the dry patting of the chicken, the careful deglazing of the pan, and the fresh finish of parsley. Whether you are a novice cook looking to expand your repertoire or a seasoned home chef seeking a reliable, high-impact dinner, this skillet provides the perfect balance of ease and elegance.
Frequently Asked Questions
Can I make this recipe dairy-free?
Yes, you can substitute the heavy cream with full-fat canned coconut milk or a dairy-free heavy cream alternative. If using coconut milk, be aware that it will add a slight tropical undertone, which actually pairs quite well with the tanginess of the peppers. To maintain the thickness, you may need to simmer the sauce for an additional 3-4 minutes.
How do I store and reheat leftovers?
This dish stores exceptionally well in an airtight container in the refrigerator for up to three days. When reheating, it is best to do so on the stovetop over low heat. Add a splash of chicken broth or water to the pan to help the cream sauce reconstitute. Avoid the microwave if possible, as high heat can cause the cream to “break” or separate from the oils.
What is the best type of skillet to use?
A heavy-bottomed stainless steel skillet or a cast-iron pan is ideal for this recipe. These materials retain heat evenly, which is crucial for achieving a proper sear on the chicken. Non-stick pans can be used, but you will find that they produce less “fond,” which may result in a slightly less flavorful sauce.
Can I use frozen chicken?
You can, but the chicken must be completely thawed and dried before cooking. Frozen chicken often releases a significant amount of water as it thaws, which will prevent the meat from browning and will dilute your sauce. For the best texture, fresh or fully thawed chicken is highly recommended.
Is this dish gluten-free?
The recipe itself is naturally gluten-free as long as you ensure your chicken broth and Italian seasoning are certified gluten-free. To keep the entire meal gluten-free, serve it over rice, quinoa, or gluten-free pasta.
Can I add vegetables to this skillet?
Absolutely. Sliced bell peppers, spinach, or mushrooms make excellent additions. If adding mushrooms or bell peppers, sauté them along with the onions to ensure they are fully cooked and slightly caramelized before you add the liquid components. If adding spinach, stir it in at the very end with the heavy cream until it just wilts.
What if I can’t find pepperoncini peppers?
While pepperoncinis have a unique flavor, you can substitute them with banana peppers or even mild pickled jalapeños. The key is to use a pickled pepper that offers both acidity and a mild heat. Ensure you still reserve the brine, as that is a key component of the sauce’s flavor profile.
Can I use chicken thighs instead of breasts?
Yes, boneless, skinless chicken thighs are an excellent alternative. They contain more fat and connective tissue, which means they remain very tender even if simmered for a bit longer. Use the same weight (1.5 lbs) and follow the instructions as written, though you may find the initial searing takes a minute or two longer to reach an internal temperature of 165°F.
PrintMastering the Pepperoncini Chicken Skillet: A Comprehensive Guide to One-Pan Excellence

This Pepperoncini Chicken Skillet is a bold, tangy, and creamy one-pan dinner made with tender chicken, peppers, and a flavorful sauce perfect for pasta or rice.
- Prep Time: 10 minutes
- Cook Time: 25 minutes
- Total Time: 35 minutes
- Yield: 4 servings
- Category: Main Dish
- Method: Skillet
- Cuisine: American
Ingredients
- Main Ingredients
- 1.5 lbs boneless skinless chicken breasts, cubed
- 1 (16 oz) jar pepperoncini peppers, drained (reserve 1/4 cup juice), chopped
- 1 medium yellow onion, chopped
- 4 cloves garlic, minced
- 2 tbsp extra virgin olive oil
- 1/2 cup low-sodium chicken broth
- 1/2 cup heavy cream
- Seasoning
- 1 tbsp Italian seasoning
- 1/4 tsp red pepper flakes
- Salt and black pepper to taste
- Garnish & Serving
- 2 tbsp fresh parsley, chopped
- Optional: cooked pasta or rice
Instructions
- Season chicken with salt and pepper and brown in olive oil until cooked through. Set aside.
- Sauté onion until softened, then add garlic and cook briefly.
- Add pepperoncini juice and scrape pan.
- Stir in chopped peppers, broth, Italian seasoning, and red pepper flakes. Simmer 5 minutes.
- Add cream and return chicken to skillet.
- Simmer until sauce thickens.
- Garnish with parsley and serve over pasta or rice.
Notes
- Add Parmesan for extra richness.
- Use thighs instead of chicken breast for more juiciness.
- Adjust spice level by changing pepperoncini and chili flakes.
- Great for quick weeknight dinners.