

Introduction: Bringing the Spirit of Philadelphia to Your Kitchen
There are few sandwiches in the American culinary canon that inspire as much passion, loyalty, and sheer craving as the Philly cheesesteak. Born in the 1930s on the streets of Philadelphia—legend has it that hot dog vendor Pat Olivieri decided to grill some beef and put it on an Italian roll, and a city’s identity was forever changed—the cheesesteak has since become a national treasure, a late-night obsession, and a source of friendly (and sometimes not-so-friendly) debate among purists.
What makes a cheesesteak “authentic”? Is it the cut of beef? The type of cheese? The presence or absence of peppers, mushrooms, or onions? The answer, as any Philadelphian will tell you, is both simple and fiercely contested. At its core, an authentic Philly cheesesteak consists of thinly sliced, well-seasoned beef, melted cheese (traditionally Cheez Whiz, though provolone and American have their devoted followings), and often grilled onions, all stuffed into a soft, slightly chewy hoagie roll. Everything beyond that is personal preference—and personal preference is sacred.
This recipe is designed to bring that authentic Philly experience to your home kitchen, no airfare required. It uses top sirloin or ribeye, sliced razor-thin (with a foolproof freezer trick to make it easy). It honors the classic combination of provolone cheese, which melts into a creamy, stretchy blanket over the beef. It includes the traditional grilled onions, plus optional (but recommended) bell peppers and mushrooms for those who enjoy a “loaded” cheesesteak. And it introduces a brilliant technique: toasting the rolls with garlic butter and spreading them with mayonnaise before assembling the sandwich, ensuring every bite is flavorful from the first to the last.
What you will not find here are complicated techniques, hard-to-find ingredients, or hours of preparation. This recipe is designed for the home cook who wants maximum flavor with minimum fuss. The active cooking time is under 30 minutes, and the result is a sandwich that rivals anything you would find on Passyunk Avenue. You will learn how to slice beef paper-thin without a deli slicer, how to caramelize onions to sweet, jammy perfection, and how to assemble a cheesesteak so that every ingredient stays where it belongs—inside the roll, not on your plate.
So clear your counter, sharpen your knife, and prepare to transport yourself to the City of Brotherly Love. The perfect Philly cheesesteak is closer than you think.
Ingredients: The Soul of the Sandwich
Before we fire up the skillet, let us take a moment to understand each ingredient. The beauty of a cheesesteak lies in its simplicity, but that simplicity demands quality. Every component matters. Below is the complete list, followed by detailed notes on selection, quality, and potential substitutions.
The Core Ingredients:
- 2 pounds top sirloin steak or ribeye, trimmed and sliced very thin
- 2 tablespoons vegetable oil, divided
- 8 slices mild provolone cheese
- 4 tablespoons butter, softened
- 4 tablespoons mayonnaise
- 4 hoagie rolls, sliced through
- 4 oz mushrooms, sliced
- 1 large yellow onion, chopped
- 1 green bell pepper
- 1 red bell pepper
- 1/2 teaspoon minced garlic
- 2 teaspoons coarse kosher salt, or to taste
- 1/2 teaspoon black pepper, or to taste
Cook Mode Note: As you prepare this recipe, you may want to prevent your screen from going dark. Most devices offer a “stay awake” or “cook mode” setting in their display options, allowing you to reference the instructions without constantly tapping the screen.
Ingredient Deep Dive
1. Top Sirloin Steak or Ribeye (2 pounds, trimmed and sliced very thin)
The beef is the heart of the cheesesteak, and the cut you choose makes all the difference. Ribeye is the gold standard for cheesesteaks. It has abundant marbling (intramuscular fat) that melts during cooking, basting the meat in its own juices and delivering unparalleled flavor, tenderness, and richness. The downside? Ribeye is expensive. Top sirloin is an excellent, more budget-friendly alternative. It is leaner than ribeye but still flavorful, and when sliced thin and cooked quickly, it remains tender. Do not use round steak, flank steak, or stew meat; these cuts are too tough and will result in a chewy, disappointing sandwich. Two pounds may sound like a lot, but remember: this recipe makes four substantial sandwiches. Leftovers (if there are any) reheat beautifully.
2. Vegetable Oil (2 tablespoons, divided)
Vegetable oil has a high smoke point and neutral flavor, making it ideal for high-heat cooking. It will be divided: 1 tablespoon for the vegetables, 1 tablespoon for the beef. You can substitute canola oil, avocado oil, or grapeseed oil. Avoid olive oil for the high-heat steak cooking, as its smoke point is lower and it can burn, imparting a bitter flavor.
3. Mild Provolone Cheese (8 slices)
Provolone is one of the three classic cheesesteak cheeses (along with Cheez Whiz and American). Mild provolone is preferred over sharp or aged provolone because it melts more smoothly and has a creamier, less assertive flavor that complements rather than overwhelms the beef. Each sandwich receives 2 slices, which is the perfect amount: enough to be gooey and satisfying, not so much that it drowns the meat. If you prefer the traditional Philly experience, you can substitute Cheez Whiz (about 2 tablespoons per sandwich) or American cheese slices. The technique for melting remains the same.
4. Butter (4 tablespoons, softened)
Softened butter, mixed with minced garlic, is spread onto the hoagie rolls before toasting. This step is not traditional in all Philly cheesesteak shops, but it is a game-changer. The butter creates a golden, crispy crust on the bread while adding richness and flavor. Use unsalted butter so you can control the salt level. If your butter is not softened, microwave it in 5-second intervals until just pliable—do not melt it completely.
5. Mayonnaise (4 tablespoons)
Mayonnaise is a controversial addition to cheesesteaks. Traditionalists may scoff, but many modern steakhouses and home cooks swear by it. The mayo adds tang, creaminess, and moisture, and it creates a barrier that prevents the bread from becoming soggy from the beef juices. If you are a purist, you can omit it. If you are curious, try it once—you may never go back. Use full-fat, real mayonnaise (not Miracle Whip or salad dressing, which are sweeter and thinner).
6. Hoagie Rolls (4)
The roll is almost as important as the beef. An authentic Philly cheesesteak roll is soft, slightly chewy, with a thin, crisp crust and a fluffy interior that can absorb juices without disintegrating. Look for hoagie rolls, sub rolls, or Italian rolls at your local bakery or grocery store. Avoid hard, crusty baguettes (too tough) or soft, squishy hamburger buns (too flimsy). If you cannot find proper hoagie rolls, a high-quality Italian sub roll is your best bet. The rolls should be sliced through lengthwise, about three-quarters of the way (like a hinge), which makes them easy to fill and flip.
7. Mushrooms (4 oz, sliced)
Mushrooms are an optional but beloved addition to many cheesesteaks, especially outside of Philadelphia. They add earthy, savory depth and a pleasant textural contrast to the beef. White button mushrooms or cremini (baby bella) mushrooms work equally well. Slice them about 1/4-inch thick so they cook quickly and evenly. If you are not a mushroom fan, simply omit them—the recipe will still be delicious.
8. Yellow Onion (1 large, chopped)
Onions are arguably the most traditional vegetable accompaniment to a cheesesteak. A large yellow onion, chopped into roughly 1/2-inch pieces, will caramelize beautifully when cooked over medium heat for 8–10 minutes, becoming sweet, golden, and slightly jammy. Yellow onions strike the perfect balance between sharpness (when raw) and sweetness (when cooked). White onions are a fine substitute; red onions are not recommended as they become mushy and lose their color.
9. Bell Peppers (1 green, 1 red)
Bell peppers are another optional addition, popular in “loaded” or “supreme” cheesesteaks. The combination of green and red peppers adds color, sweetness (the red pepper is sweeter), and a slight bitterness (the green pepper). Both are chopped into similar-sized pieces as the onions so they cook evenly. If you prefer a more traditional cheesesteak, omit the peppers. If you love them, keep them.
10. Minced Garlic (1/2 teaspoon)
The garlic is mixed into the softened butter and spread on the rolls before toasting. Half a teaspoon is enough to add aromatic flavor without overwhelming the sandwich. Use fresh garlic, minced very finely, or jarred minced garlic in a pinch. Do not use garlic powder for this application; fresh garlic’s moisture and texture incorporate better into the butter.
11. Coarse Kosher Salt (2 teaspoons, or to taste)
Kosher salt is preferred over table salt because its larger, flakier crystals dissolve more evenly and are easier to distribute. The salt is used primarily to season the beef, but also to season the vegetables as they cook. Two teaspoons is a starting point; taste and adjust. If you are using table salt, reduce the amount by half (1 teaspoon) because table salt is denser and saltier by volume.
12. Black Pepper (1/2 teaspoon, or to taste)
Freshly ground black pepper is always superior to pre-ground. It adds a subtle warmth and bite that complements the rich beef and cheese. Grind it coarsely for more texture and flavor.
Preparation Method: Step-by-Step to Cheesesteak Perfection
Now, we move from ingredient appreciation to action. Follow these instructions carefully, and you will be rewarded with a perfect Classic Philly Cheesesteak. The total active time is approximately 45 minutes, including the freezer time for the beef.
Step 1: Freeze and Prepare the Steak (35 minutes, mostly inactive)
Action: Place the 2 pounds of top sirloin steak or ribeye on a plate or baking sheet and transfer it to the freezer. Freeze for 30 minutes. The goal is not to freeze the meat solid, but to firm it up so it is stiff but still sliceable. While the meat is in the freezer, prepare your other ingredients: chop the onion, slice the mushrooms, chop the bell peppers, mince the garlic, and slice the hoagie rolls (cut them lengthwise about three-quarters of the way through, like a hinge).
After 30 minutes, remove the steak from the freezer. Using a very sharp knife, slice the meat as thin as possible across the grain. The slices should be almost shaved—think deli-thin, no thicker than 1/8 inch. If you have a meat slicer, now is the time to use it. Once sliced, trim any large pieces of excess fat (marbling is good; large fat caps are not). Season the sliced beef generously with 2 teaspoons of coarse kosher salt and 1/2 teaspoon of black pepper (or to taste). Toss to coat evenly.
Why this matters: Freezing the beef firms it up, making it possible to slice it paper-thin with a regular kitchen knife. Thin slicing is absolutely critical for an authentic cheesesteak. Thick chunks of beef will be chewy, take longer to cook, and will not meld properly with the cheese and vegetables. Slicing across the grain (perpendicular to the direction of the muscle fibers) shortens those fibers, ensuring tender bites. Seasoning the beef before cooking allows the salt and pepper to penetrate the meat, not just sit on the surface.
Pro Tip: If you have a good relationship with your butcher, ask them to slice the beef for you. Many butchers will slice ribeye or sirloin paper-thin on their deli slicer if you ask nicely. This saves you the freezer step and the knife work.
Step 2: Prepare the Garlic Butter and Toast the Rolls (5 minutes)
Action: In a small bowl, combine 4 tablespoons of softened butter with 1/2 teaspoon of minced garlic. Mix until the garlic is evenly distributed throughout the butter. Spread the garlic butter mixture on the cut sides of each hoagie roll (both the top and bottom halves). Heat a large skillet or griddle over medium heat. Place the rolls cut-side down on the hot surface. Toast for 1–2 minutes until the buttered surfaces are golden brown and crispy. Do not walk away—they can burn quickly. Remove the rolls from the skillet and set them aside, cut-side up.
Why this matters: Toasting the rolls with garlic butter serves multiple purposes. It adds flavor, obviously. It also creates a barrier that helps prevent the bread from becoming soggy when it meets the juicy beef. And the crisp texture provides a satisfying contrast to the tender meat and melted cheese. Toasting cut-side down ensures the interior gets crispy while the exterior stays soft.
Pro Tip: If you have a griddle or a large flat-top, use it. If not, work in batches or use two skillets. Do not overcrowd the rolls; they need direct contact with the hot surface to toast properly.
Step 3: Cook the Vegetables (10 minutes)
Action: Heat 1 tablespoon of vegetable oil in a large skillet (the same one you used for the rolls works fine) over medium heat. Add the following:
- 1 large yellow onion, chopped
- 1 green bell pepper, chopped
- 1 red bell pepper, chopped
- 4 oz mushrooms, sliced
Sauté, stirring occasionally, for 8–10 minutes. The vegetables should become soft, slightly caramelized (golden brown edges), and fragrant. The onions will turn translucent and then start to brown. The mushrooms will release their liquid and then begin to brown. Season lightly with a pinch of salt and pepper. Once cooked, remove the vegetables from the skillet and set them aside on a plate.
Why this matters: Cooking the vegetables separately from the beef allows them to develop their own flavor through browning. If you cooked them together, the vegetables would release water, which would steam the beef instead of searing it. The 8–10 minute cook time over medium heat is long enough to soften and sweeten the onions without burning them. Mushrooms need time to release their water and then brown; this is when they become truly flavorful.
Pro Tip: Do not crowd the skillet. If your skillet is small (less than 10 inches), cook the vegetables in two batches. Overcrowding causes steaming instead of browning, resulting in pale, watery vegetables.
Step 4: Cook the Steak (5 minutes)
Action: Increase the heat under the same skillet to medium-high. Add the remaining 1 tablespoon of vegetable oil. Once the oil is shimmering (nearly smoking), add the seasoned, sliced steak in a single, even layer. Do not stir or move the meat for 2–3 minutes. This allows the bottom layer to develop a deep, caramelized crust. After 2–3 minutes, flip the meat using a spatula or tongs. Cook for another 2–3 minutes on the second side, stirring occasionally to ensure even cooking. The steak should be browned on the outside and just cooked through (no pink remaining, though some prefer a hint of pink—cheesesteak beef is traditionally cooked well-done).
Why this matters: High heat and minimal movement are the secrets to a great sear. The Maillard reaction—the chemical process that creates deep, savory, browned flavors—requires direct, intense heat and time. If you stir the meat constantly, it will steam and turn gray instead of browning. Cooking the steak in a single layer ensures maximum surface area contact with the hot pan. Because the beef is sliced so thin, 4–6 minutes total cooking time is sufficient.
Pro Tip: If your skillet is not large enough to hold all 2 pounds of beef in a single layer, cook it in two batches. Overcrowding will cause the beef to steam and release water, preventing browning. If you must cook in batches, transfer the first batch to a plate and cook the second batch separately, then combine them before adding the vegetables.
Step 5: Combine Beef and Vegetables (1 minute)
Action: Return the cooked onions, peppers, and mushrooms to the skillet with the steak. Stir to combine everything thoroughly. The residual heat from the beef will warm the vegetables back up. Use your spatula to break up any large clumps of meat and distribute the vegetables evenly throughout the beef mixture. Divide the mixture into 4 equal portions directly in the skillet, creating four piles roughly the size and shape of your hoagie rolls.
Why this matters: Combining the beef and vegetables allows their flavors to meld. The vegetables pick up the savory beef juices, and the beef benefits from the sweetness of the caramelized onions and peppers. Dividing into portions before adding the cheese makes assembly easier and ensures each sandwich gets an equal amount of filling.
Pro Tip: Use the edge of your spatula to press each portion into a rough rectangle or oval that matches the length of your rolls. This makes the flipping step much easier.
Step 6: Melt the Provolone Cheese (2 minutes)
Action: Place 2 slices of mild provolone cheese on top of each of the four portions of beef and vegetables. Turn off the heat completely. Cover the skillet with a lid or a large piece of aluminum foil. Let the residual heat melt the cheese for 1–2 minutes. Do not stir. The cheese should become soft, gooey, and fully melted, draping over the beef like a blanket.
Why this matters: Turning off the heat before adding the cheese prevents the cheese from overheating, which would cause it to become oily, separate, or develop a tough skin. The residual heat from the skillet and the hot beef is more than enough to melt the cheese gently and evenly. Covering the skillet traps the heat and helps the cheese melt faster and more uniformly.
Pro Tip: If you prefer a browner, slightly crispy cheese top, you can leave the heat on low for 1 minute after adding the cheese, then turn it off. Watch carefully to prevent burning. Alternatively, you can use a kitchen torch to brown the cheese after it melts—this is not traditional but is undeniably delicious.
Step 7: Assemble the Sandwiches (2 minutes)
Action: Spread 1 tablespoon of mayonnaise on the toasted, cut side of each hoagie roll (both the top and bottom halves, or just the bottom—your preference). Place each roll, cut-side down, over one of the four cheese-topped meat piles in the skillet. Press down gently so the roll makes contact with the cheese and meat. Using a large, sturdy spatula, slide it under the meat pile and roll together, then flip the entire assembly so the roll ends up on the bottom with the meat and cheese on top. The meat should be nestled inside the roll. Serve immediately.
Why this matters: The flipping technique is the classic Philly cheesesteak assembly method. It ensures that the bread is perfectly positioned on the bottom, supporting the filling, and that the cheese stays on top of the meat (where it belongs). Spreading mayonnaise on the toasted roll adds tang and creaminess and creates a moisture barrier. Serving immediately is critical; a cheesesteak waits for no one. The bread should be warm, the cheese stretchy, and the beef hot.
Pro Tip: If you are nervous about the flip, you can instead use a spatula to lift the meat and cheese portion and place it directly into the roll. The traditional flip is showy and fun, but the result is the same either way. Serve the sandwiches wrapped in deli paper or foil to help them hold their shape and keep them warm.
Conclusion: Your Ticket to Philly, No Plane Required
The Easy Classic Philly Cheesesteak is proof that you do not need a plane ticket, a time machine, or a secret family recipe to create authentic regional cuisine at home. With quality ingredients, a few simple techniques, and a hot skillet, you can transport yourself and your family to the streets of Philadelphia—specifically, to the corner of 9th and Passyunk, where Pat’s King of Steaks still serves its legendary sandwiches to hungry crowds.
This recipe honors tradition while embracing practicality. It uses the freezer trick to make thin slicing accessible to every home cook. It toasts the rolls in garlic butter for an extra layer of flavor. It offers the flexibility to include mushrooms and bell peppers for those who like a loaded cheesesteak, while keeping the core—thinly sliced beef, melted provolone, caramelized onions—pure and authentic.
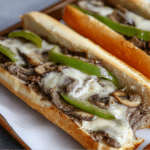
What you will find when you take that first bite is a harmony of textures and flavors: the crisp, buttery roll giving way to tender, savory beef; the sweet, soft onions and peppers contrasting with the earthy mushrooms; the stretchy, melty provolone pulling away in glorious strings; and the subtle tang of mayonnaise tying it all together. It is messy, indulgent, and deeply satisfying—everything a great sandwich should be.
So the next time a craving strikes, skip the chain restaurant and head to your own kitchen. With 45 minutes and this recipe, you are the king of your own steak.
Frequently Asked Questions (FAQ)
1. Can I use a different cut of beef if I can’t find top sirloin or ribeye?
Yes, but choose carefully. The best alternatives are prime rib (expensive but incredible), strip steak (also known as New York strip), or flap meat (also called sirloin tip). Avoid round steak, chuck steak, brisket, or flank steak; these cuts are too tough and chewy for a cheesesteak, even when sliced thin. If you are on a tight budget, eye of round can work if sliced paper-thin and cooked very quickly, but it will not be as tender as ribeye or sirloin.
2. Do I have to use provolone? Can I use Cheez Whiz or American?
Absolutely. The three classic cheesesteak cheeses are Cheez Whiz, provolone, and American. Each has its devoted fans. Cheez Whiz is the most traditional at Pat’s and Geno’s, the two most famous Philly steakhouses. It is salty, creamy, and deeply nostalgic. To use Cheez Whiz, warm it slightly (microwave for 15 seconds) and drizzle about 2 tablespoons over each portion of meat. American cheese melts beautifully and has a milder flavor than provolone. Use 2 slices per sandwich. The technique for melting remains the same regardless of cheese.
3. My butcher sliced the beef for me. Do I still need to freeze it?
No. The freezer step is only to make slicing easier at home. If your butcher has already sliced the beef paper-thin (on a deli slicer), you can skip the freezer step entirely. Simply season the beef as directed and proceed with the recipe.
4. Can I make this recipe on a griddle or flat-top grill?
Yes, and a griddle is actually ideal for cheesesteaks. The large, flat surface allows you to cook everything at once and makes the flipping assembly method even easier. Follow the same steps: cook the vegetables, push them to one side, cook the beef on the other side, combine, top with cheese, and place the rolls directly on top of the meat to steam and soften before flipping. A Blackstone griddle or a large cast-iron griddle pan works beautifully.
5. How do I store and reheat leftovers?
Leftover cheesesteak filling (without the rolls) can be stored in an airtight container in the refrigerator for up to 3 days. To reheat, place the filling in a skillet over medium heat, stirring occasionally, until hot throughout. Toast fresh rolls, add mayonnaise, and assemble as directed. It is not recommended to store assembled cheesesteaks, as the bread will become soggy. The filling alone does not freeze well because the texture of the beef and vegetables degrades upon thawing. For best results, make only as much as you will eat fresh.
6. Can I cook the steak and vegetables together to save time?
Technically yes, but the result will be inferior. Cooking the steak and vegetables together causes the vegetables to release water, which steams the beef instead of searing it. You will end up with gray, flavorless meat and pale, soft vegetables instead of browned, caramelized ones. The extra 10 minutes to cook the vegetables separately is well worth the improvement in flavor and texture.
7. Why is my steak chewy even though I sliced it thin?
Several factors could be at play. First, you may have sliced the steak with the grain instead of across it. Always slice across the grain (perpendicular to the muscle fibers) to shorten those fibers and ensure tenderness. Second, you may have used a tough cut of beef (like round or chuck). Stick to ribeye or top sirloin. Third, you may have overcooked the beef. Because it is sliced so thin, it needs only 4–6 minutes total. Overcooking causes the proteins to tighten and squeeze out moisture, resulting in dry, chewy meat.
8. Can I make this recipe gluten-free?
Yes, with a good gluten-free hoagie roll. The rest of the ingredients are naturally gluten-free: beef, vegetables, oil, butter, cheese, mayonnaise, salt, pepper, and garlic. The key is finding a gluten-free roll that is soft and pliable, not dry and crumbly. Brands like Schär, Canyon Bakehouse, or Udi’s offer gluten-free hoagie-style rolls. Toast them as directed. Everything else remains the same.
9. I don’t have a lid for my skillet. How do I melt the cheese?
You have several options. Cover the skillet with a large piece of aluminum foil, crimping the edges to trap the heat. Alternatively, turn the heat to low, add the cheese, and cover with a baking sheet or another inverted skillet. Or, transfer the meat portions to a baking sheet, top with cheese, and place under the broiler for 30–60 seconds until the cheese melts and bubbles. The foil method is the easiest and most effective.
10. Can I add other toppings like hot peppers or ketchup?
Absolutely. In Philadelphia, it is common to order your cheesesteak “with” (onions) or “without,” and then add your own condiments at the counter. Popular additions include sweet or hot pickled peppers (cherry peppers or banana peppers), ketchup, hot sauce (like Frank’s RedHot), and even pizza sauce (creating a “pizza steak”). Add these after the sandwich is assembled, to your taste. Some people also like to add raw onions on top of the grilled onions for extra crunch and sharpness.
11. Why do you add mayonnaise to the roll? Is that authentic?
Mayonnaise is not traditional in classic Philly cheesesteaks, but it has become increasingly popular, especially in variations and at modern sandwich shops. It adds creaminess, tang, and a moisture barrier that prevents the bread from getting soggy. If you are a purist, omit it. If you are curious, try it once—many home cooks find it elevates the sandwich. You can also substitute horseradish sauce or aioli for a different flavor profile.
12. Can I use a different type of onion?
Yes, but yellow onions are preferred for their balance of sharpness and sweetness when cooked. White onions are a fine substitute; they are slightly sharper raw but mellow when cooked. Red onions are not recommended for cheesesteaks because they become mushy and lose their vibrant color when cooked for 8–10 minutes. If all you have is red onion, reduce the cooking time to 5–6 minutes to keep some texture.
13. How do I get that classic “chopped” texture for the beef?
On a traditional Philly cheesesteak griddle, the cook uses two large metal spatulas to chop and mix the beef as it cooks. You can replicate this at home: after the beef has browned on both sides, use the edge of your spatula to chop through the meat repeatedly, breaking it into smaller, irregular pieces. This creates more surface area for browning and helps the beef meld with the vegetables and cheese. Continue chopping and mixing for 1–2 minutes before adding the cheese.
14. Can I make this recipe for a crowd?
Yes. For 8 sandwiches, double all ingredients. You will likely need to cook in batches, as most home skillets cannot hold 4 pounds of beef at once. Cook the vegetables in two batches (or one very large batch in a roasting pan on the stovetop). Cook the beef in two batches, then combine everything in a large roasting pan or Dutch oven to keep warm while you finish. Toast the rolls in batches. Assemble as directed. A griddle or flat-top grill is ideal for large-batch cheesesteak cooking.
15. What is the best way to reheat an assembled cheesesteak if I have leftovers?
The best method is to separate the filling from the bread. Remove the meat, cheese, and vegetables from the roll. Reheat the filling in a skillet over medium heat until hot and sizzling. Meanwhile, toast a fresh roll (or reheat the original roll in the oven at 350°F for 3–4 minutes). Reassemble with fresh mayonnaise. If you must reheat an assembled sandwich, wrap it tightly in foil and place it in a 350°F oven for 10–15 minutes. The bread will be softer than the original, and the cheese may be less stretchy, but it will still be tasty. Avoid the microwave, which makes the bread rubbery and the cheese oily.
Easy Classic Philly Cheesesteak Recipe: Authentic Flavor at Home
This easy classic Philly cheesesteak recipe delivers authentic flavor at home with tender sliced steak, melted provolone, caramelized onions, and toasted hoagie rolls.
- Prep Time: 20 minutes
- Cook Time: 20 minutes
- Total Time: 40 minutes
- Yield: 4 servings
- Category: Main Dish, Sandwich
- Method: Stovetop
- Cuisine: American
Ingredients
- 2 lbs top sirloin or ribeye, thinly sliced
- 2 tbsp vegetable oil, divided
- 8 slices provolone cheese
- 4 tbsp butter, softened
- 4 tbsp mayonnaise
- 4 hoagie rolls
- 4 oz mushrooms, sliced
- 1 large yellow onion, chopped
- 1 green bell pepper, sliced
- 1 red bell pepper, sliced
- 1/2 tsp minced garlic
- 2 tsp kosher salt (to taste)
- 1/2 tsp black pepper (to taste)
Instructions
- Freeze steak for 30 minutes, then slice very thin and season with salt and pepper.
- Mix butter with garlic and spread on hoagie rolls. Toast until golden and set aside.
- Sauté onions in 1 tbsp oil for 8–10 minutes until caramelized. Remove.
- Cook steak in remaining oil over medium-high heat for 2–3 minutes per side.
- Return onions (and peppers if using) to skillet and mix with steak.
- Divide into portions and top with provolone cheese. Let melt.
- Spread mayonnaise on toasted rolls.
- Fill rolls with steak mixture and serve immediately.
Notes
- Freezing the steak helps achieve paper-thin slices.
- Use ribeye for more authentic flavor and tenderness.
- Cheese whiz can be substituted for provolone if desired.