

Introduction
There are certain dishes that transcend mere sustenance and enter the realm of craving. Spicy Dragon Chicken is one of those dishes. With its dazzling name, fiery red glaze, and the perfect balance of crispy-yet-tender chicken bites coated in a glossy, pungent, sweet-sour-spicy sauce, it has become a staple on Indo-Chinese and Asian takeout menus worldwide. Yet, for all its dramatic flair, it remains surprisingly elusive to replicate at home—until now.
If you have ever ordered Spicy Dragon Chicken and wondered how restaurants achieve that impossibly crunchy exterior that stays crisp even after being tossed in a thick, sticky sauce, you are not alone. The secret lies not in a deep fryer vat or mysterious powders, but in a few precise techniques: the double-layered coating, the temperature control of the frying oil, the high-heat stir-fry of aromatics, and the careful balance of sweet, sour, salty, and spicy elements. This article will demystify every step.
This recipe is not merely a list of ingredients and instructions. It is a comprehensive guide to mastering the art of restaurant-style Spicy Dragon Chicken in your own kitchen. We will explore why cornstarch and all-purpose flour work together, how to prevent soggy chicken, the role of each sauce component, and how to achieve that signature “dragon” colour and sheen. We will also address common pitfalls—from clumpy slurry to bitter garlic—and provide professional solutions.
Whether you are cooking for a weeknight dinner that excites the palate or impressing guests with a takeout classic made from scratch, this recipe delivers authenticity, flavour, and texture. The ingredients you provided are simple, but when executed with care, they transform into something spectacular.
Let us begin by understanding each component, then move step-by-step through the preparation. By the end, you will not only have a plate of fiery, addictive chicken but also the confidence to adapt and experiment.
Ingredients
*Note: This recipe serves 3–4 people as part of a multi-dish meal, or 2 as a hearty main with rice.*
For the Chicken (Frying):
- 300g boneless chicken (thin strips) – Use thigh meat for juiciness or breast for leaner texture
- 2 tbsp cornstarch
- 2 tbsp all-purpose flour
- 1 egg
- Salt & black pepper (to taste)
- Oil (for deep-frying) – Use a neutral oil with high smoke point (vegetable, canola, or peanut oil)
For the Sauce (Stir-Fry):
- 2 tbsp oil (for sauce) – Same neutral oil as above
- 1 tbsp garlic (finely chopped)
- 1 tbsp ginger (finely chopped)
- 2–3 dried red chilies – Adjust to heat preference; break them in half for more spice release
- 1 onion (sliced) – Yellow or red onion, cut into half-moons or wedges
- 1 capsicum (sliced) – Green, red, or yellow; green is traditional for colour contrast
- 2 tbsp soy sauce – Use light soy sauce (not dark) for balanced saltiness
- 1 tbsp chili sauce – Sriracha, garlic chili sauce, or Asian chili paste
- 1 tbsp ketchup – Adds sweetness, colour, and body
- 1 tsp vinegar – Rice vinegar or white distilled vinegar
- 1 tsp sugar – Balances the heat and acidity
- ½ tsp crushed chili flakes – Optional but recommended for extra heat and texture
- ¼ cup water – To deglaze and create the sauce base
- 1 tsp cornstarch mixed with 2 tbsp water (slurry) – For thickening
Optional Garnishes:
- Sliced spring onions (scallions)
- Sesame seeds (white or black)
- Extra dried red chilies for visual drama
Preparation Method
Phase 1: Mise en Place – The Professional’s First Step
Before any heat is applied, complete all your chopping and measuring. Finely chop the garlic and ginger separately (or together if you work quickly). Slice the onion into thin wedges or half-rings. Slice the capsicum into similarly sized strips for even cooking. Break the dried red chilies into halves or thirds, shaking out some seeds if you prefer less heat. In a small bowl, mix the cornstarch slurry (1 tsp cornstarch + 2 tbsp water) and set aside.
Having everything ready is non-negotiable here because the stir-frying and sauce-building happen rapidly—within 3–4 minutes total.
Phase 2: Prepare the Chicken Coating – The Secret to Crispy Dragon Chicken
Cut the 300g boneless chicken into thin, bite-sized strips, approximately 5cm long and 1cm wide. Uniform size ensures even cooking. Pat the chicken pieces dry with paper towels—excess moisture prevents the coating from adhering properly.
In a medium bowl, crack the egg and beat it lightly with a fork. Add the chicken strips, salt, and black pepper to taste. Mix well until every piece is coated in egg.
In a separate shallow bowl or plate, combine the 2 tablespoons of cornstarch and 2 tablespoons of all-purpose flour. Whisk them together with a fork. This dual-flour system is critical: cornstarch provides the signature light, crackly crispness, while all-purpose flour adds structure and browning.
Working in batches, dredge each egg-coated chicken strip in the flour-cornstarch mixture. Press gently to adhere, then shake off any excess. Place the coated strips on a wire rack or a plate in a single layer. Do not stack them, or they will stick together. Let them rest for 5 minutes—this allows the coating to hydrate slightly and adhere better during frying.
Phase 3: Deep-Frying – Achieving Golden, Crispy Perfection
Pour enough oil into a heavy-bottomed pot or wok to reach a depth of about 5cm (2 inches). Heat the oil to 175°C (350°F). If you do not have a thermometer, test by dropping a small piece of coating into the oil: it should sizzle vigorously and rise to the surface within 2–3 seconds without burning.
Fry in batches: Overcrowding lowers the oil temperature drastically, resulting in greasy, soggy chicken. Fry 6–8 strips at a time. Gently slide them into the oil using a slotted spoon or chopsticks. Fry for 2–3 minutes until the exterior is pale golden. Remove and drain on a wire rack set over a baking sheet (paper towels will make the bottom soggy).
Double-fry for extra crispiness (restaurant secret): After the first fry of all batches, let the chicken rest for 5 minutes. Then, increase the oil temperature to 190°C (375°F). Fry each batch again for 45–60 seconds until deep golden-brown and shatteringly crisp. This second fry expels residual oil and creates that coveted crunchy shell that holds up against the sauce. Set the fried chicken aside on a clean rack.
Phase 4: The Stir-Fry Base – Building Aromatic Depth
Discard the frying oil (save it for another use if you strained it), or use a clean wok or large pan. Add the 2 tablespoons of fresh oil for the sauce and heat over medium-high heat until shimmering.
Add the finely chopped garlic, finely chopped ginger, and the dried red chilies. Stir-fry for 20–30 seconds only. Do not brown the garlic—browned garlic becomes bitter. You want it fragrant and just softened.
Phase 5: Add Vegetables – High Heat, Short Time
Turn the heat to high. Add the sliced onion and sliced capsicum. Stir-fry vigorously for 60–90 seconds. The goal here is not to cook them through completely but to achieve “wok hei” (breath of the wok) – a slight char and vibrant crunch. The onions should become translucent at the edges but still hold their shape; the capsicum should remain bright and crisp. Overcooking leads to mushiness.
Phase 6: Build the Sauce – Balancing Five Flavours
Reduce the heat slightly to medium. Add the following directly to the pan, in order:
- 2 tbsp soy sauce (pour around the edges of the pan for quick caramelisation)
- 1 tbsp chili sauce
- 1 tbsp ketchup
- 1 tsp vinegar
- 1 tsp sugar
- ½ tsp crushed chili flakes (if using)
Stir everything together quickly. The mixture will bubble and darken immediately. This rapid incorporation of wet ingredients deglazes the pan, lifting any browned bits from the garlic, ginger, and vegetables.
Phase 7: Simmer and Thicken – The Glossy Finish
Pour in the ¼ cup of water. Stir well and bring the sauce to a gentle simmer. Let it bubble for 30 seconds to allow the sugar to dissolve and the flavours to meld.
Give the cornstarch slurry a quick stir (the cornstarch settles rapidly), then pour it into the simmering sauce while stirring constantly. Within 15–20 seconds, you will see the sauce transform from a thin liquid into a glossy, semi-translucent glaze that coats the back of a spoon. If it becomes too thick, add 1–2 tablespoons of water. If too thin, simmer for another 30 seconds or add a tiny bit more slurry (mix another ½ tsp cornstarch with 1 tbsp water).
Phase 8: Combine and Finish – Coating the Dragon
Turn off the heat. Add all the fried chicken strips to the pan. Using a wide spatula or tongs, gently toss the chicken in the sauce until every piece is evenly coated. The residual heat will warm the chicken without softening the crust too much.
Turn the heat back on to medium and cook for an additional 2–3 minutes, stirring occasionally. During this time, the sauce will cling more tightly to the chicken, reducing slightly into a thicker, tacky glaze that envelops each strip like a fiery dragon’s breath.
Phase 9: Plating and Serving
Transfer the Spicy Dragon Chicken to a serving platter. Garnish with sliced spring onions, a sprinkle of sesame seeds, and perhaps a few extra dried red chilies for visual impact. Serve immediately with steamed jasmine rice, fried rice, or noodles.
Conclusion
Spicy Dragon Chicken is more than a takeout order—it is a lesson in contrast: crispy versus tender, fiery versus sweet, aromatic versus pungent. By following this guide, you have learned not just a recipe but a framework for Indo-Chinese cooking: the importance of a dual-coating for crunch, the magic of double-frying, the speed of high-heat stir-frying, and the precise balancing of soy, chili, ketchup, and vinegar.
The dish you have just made should boast chicken that audibly crackles when bitten, a sauce that is glossy and clinging but not cloying, and a heat level that builds without overwhelming. Adjust the dried red chilies and chili flakes to your tolerance, and feel free to add vegetables like broccoli, snap peas, or carrots for variety.
Now that you have mastered Spicy Dragon Chicken, you hold the key to countless variations: swap chicken for paneer (vegetarian), add cashews for richness, or turn up the Sichuan peppercorns for a numbing effect. The technique remains your foundation.
Enjoy your restaurant-quality creation, and take pride in knowing you have transformed humble ingredients into something truly craveable.
Frequently Asked Questions (FAQs)
Q1: Can I use chicken breast instead of thigh meat?
A: Yes. Chicken breast will work, but it is leaner and can dry out during frying. To compensate, do not overcook it—follow the same frying times precisely. For the juiciest results, boneless chicken thighs are highly recommended for this recipe.
Q2: My chicken coating turned out soft, not crispy. What went wrong?
A: Most likely one of three issues: (1) The oil temperature was too low during the first fry, causing the chicken to absorb oil instead of crisping. (2) You skipped the double-fry method. (3) You coated the chicken too far in advance, allowing the flour to become soggy. Fry immediately after coating, and always double-fry for restaurant crispiness.
Q3: Can I make Spicy Dragon Chicken gluten-free?
A: Absolutely. Replace the 2 tablespoons of all-purpose flour with additional cornstarch (total 4 tbsp cornstarch, no flour). Use tamari or coconut aminos instead of soy sauce. Ensure your chili sauce and ketchup are gluten-free (most are, but check labels).
Q4: How do I adjust the spice level?
A: For milder: Use only 1 dried red chili (remove seeds) and omit the crushed chili flakes. For spicier: Use 4–5 dried chilies, keep the seeds, add 1 tsp of chili oil or Sichuan chili crisp along with the sauce ingredients, and increase chili flakes to 1 tsp.
Q5: Can I air-fry or bake the chicken instead of deep-frying?
A: Yes, but the texture will differ. To air-fry: Spray the coated chicken strips with oil and air-fry at 200°C (400°F) for 8–10 minutes, shaking halfway, until golden and crisp. To bake: Place on a wire rack over a baking sheet, spray with oil, and bake at 220°C (425°F) for 12–15 minutes. The sauce will still be delicious, but the crust will be less shatteringly crisp than deep-frying.
Q6: Why does my sauce taste too salty?
A: Soy sauces vary greatly in sodium content. Use low-sodium soy sauce if possible. Also, ensure you are using exactly 2 tablespoons—no more. If the sauce is still too salty, add an extra teaspoon of ketchup or sugar to balance, or a splash more water to dilute.
Q7: Can I prepare this dish ahead of time for a party?
A: Partially. You can fry the chicken (first fry only) up to 2 hours in advance. Keep it at room temperature. Right before serving, do the second fry, make the sauce fresh, and toss. The sauce does not hold well—it thickens and becomes pasty upon reheating. Always make the sauce immediately before serving.
Q8: What is the best substitute for dried red chilies?
A: Use 1–2 teaspoons of red chili flakes (adjust to taste) or 1–2 fresh red chilies (like bird’s eye or serrano), sliced thinly. Add fresh chilies at the same time as the garlic and ginger.
Q9: My cornstarch slurry turned into a solid lump in the sauce. How do I fix that?
A: This happens when the slurry is added to a sauce that is not simmering, or when it is not stirred immediately. To fix: Whisk vigorously and add 2–3 tablespoons of hot water while whisking. The lumps should dissolve. For next time, always stir the slurry right before pouring, and add it to a gently bubbling sauce while stirring constantly.
Q10: What can I serve with Spicy Dragon Chicken besides rice?
A: This dish pairs beautifully with vegetable fried rice, Hakka noodles, lo mein, steamed bok choy, or a simple cucumber salad with sesame dressing. For a low-carb option, serve over cauliflower rice or zucchini noodles.
Q11: Can I freeze leftover Spicy Dragon Chicken?
A: Not recommended. The fried chicken will become completely soft upon thawing and reheating, and the sauce will separate. If you must, freeze the fried chicken (before tossing in sauce) in an airtight container for up to 1 month. Re-crisp in an oven or air-fryer, then make fresh sauce.
Q12: Is Spicy Dragon Chicken the same as Chilli Chicken or Kung Pao Chicken?
A: No, though they share similarities. Chilli Chicken typically uses a darker, soy-heavy sauce with more vinegar. Kung Pao Chicken includes peanuts and Sichuan peppercorns. Spicy Dragon Chicken is distinct for its bright red colour (from ketchup and chili sauce), glossy glaze, and the specific crackly coating described in this recipe.
Spicy Dragon Chicken: The Asian Takeout Favorite You’ll Crave (Restaurant Secrets Revealed)
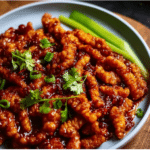
Spicy Dragon Chicken is a bold Asian takeout-style dish featuring crispy fried chicken tossed in a spicy, tangy, and slightly sweet chili garlic sauce with crunchy vegetables.
- Prep Time: 15 minutes
- Cook Time: 20 minutes
- Total Time: 35 minutes
- Yield: 3 servings
- Category: Main Dish
- Method: Stir-fry & Fry
- Cuisine: Indo-Chinese
Ingredients
- 300g boneless chicken (thin strips)
- 2 tbsp cornstarch
- 2 tbsp all-purpose flour
- 1 egg
- Salt & black pepper (to taste)
- Oil (for frying)
- 2 tbsp oil (for sauce)
- 1 tbsp garlic (finely chopped)
- 1 tbsp ginger (finely chopped)
- 2–3 dried red chilies
- 1 onion (sliced)
- 1 capsicum (sliced)
- 2 tbsp soy sauce
- 1 tbsp chili sauce
- 1 tbsp ketchup
- 1 tsp vinegar
- 1 tsp sugar
- ½ tsp crushed chili flakes
- ¼ cup water
- 1 tsp cornstarch mixed with 2 tbsp water (slurry)
Instructions
- Mix chicken with egg, flour, cornstarch, salt, and black pepper until well coated.
- Deep fry chicken until golden and crispy. Set aside.
- Heat oil in a pan and sauté garlic, ginger, and dried chilies until fragrant.
- Add onion and capsicum and stir-fry on high heat until slightly crunchy.
- Add soy sauce, chili sauce, ketchup, vinegar, sugar, and chili flakes. Mix well.
- Pour in water and bring to a gentle simmer.
- Add cornstarch slurry and cook until sauce thickens.
- Add fried chicken and toss well to coat evenly.
- Cook for 2–3 minutes until sauce sticks to chicken. Serve hot.
Notes
- Adjust spice level by increasing or reducing dried chilies and chili flakes.
- For extra crispiness, double-fry the chicken.
- Serve immediately for best texture.