
Introduction
There are certain culinary marriages that feel destined. The Philly cheesesteak—a legendary sandwich born on the streets of Philadelphia, featuring thinly sliced beef, melted cheese, and sautéed onions on a hoagie roll—is one of America’s most beloved comfort foods. Pasta—the versatile, forgiving, universally adored canvas for sauces of all kinds—is another. When these two icons come together, the result is nothing short of spectacular: Creamy Philly Cheesesteak Pasta.
This dish takes the soul of the classic cheesesteak—savory beef, sweet softened onions, tender bell peppers, and rich, molten cheese—and transforms it into a one-skillet, oven-finished pasta that is simultaneously familiar and fresh. It is weeknight-friendly enough for a busy family dinner yet impressive enough to serve to guests. It requires no obscure ingredients, no advanced culinary techniques, and no specialized equipment. Yet, when executed correctly, it delivers layers of flavor and texture that feel far more complex than the sum of its parts.
The ingredient list you provided is deceptively simple. Ground beef or steak strips provide the protein backbone, offering a choice between the rustic ease of ground meat and the more authentic chew of thinly sliced steak. A green bell pepper and an onion form the aromatic foundation, their natural sweetness emerging as they sauté. Garlic adds its characteristic pungent warmth. Cream cheese, softened to silky readiness, melts into the beef broth to create a luscious, tangy, velvety sauce without the need for a traditional flour-based roux. Shredded provolone cheese—the classic cheesesteak cheese, known for its excellent melting properties and mild, buttery flavor—finishes the dish under the broiler, creating a golden, bubbly, irresistible crust. Pasta, preferably penne or rigatoni with their ridges and hollow centers, captures every bit of the creamy, beefy sauce. A single tablespoon of olive oil, salt, and pepper round out the ingredients. That is it. No heavy cream, no processed cheese sauce, no canned soup.
This article is your professional guide to mastering Creamy Philly Cheesesteak Pasta. We will explore each ingredient in depth, discuss the critical decision between ground beef and steak strips, explain the science of cream cheese emulsions, and provide a foolproof, step-by-step preparation method. We will also address the broiling technique that creates the signature golden provolone topping, a step that elevates this dish from simple pasta to a showstopping casserole. Whether you are a home cook looking to expand your weeknight repertoire or a culinary enthusiast seeking to understand how to build creamy sauces without flour, this guide will give you the confidence and knowledge to produce a perfect dish every time.
Why does this recipe work so well? The answer lies in its structural simplicity and the clever use of cream cheese. Unlike traditional creamy pasta sauces that require a roux (butter and flour cooked together) or heavy cream, cream cheese provides immediate body, tanginess, and stability. When whisked into hot beef broth, it breaks down into a smooth, homogeneous sauce that clings beautifully to pasta. The provolone cheese, added at the end and broiled, provides not only flavor but also a textural contrast: a crispy, blistered cheese crust atop a creamy, tender pasta. The green bell pepper, often omitted in lesser versions, adds a slight bitterness and grassy note that cuts through the richness, preventing the dish from becoming one-dimensional.
Throughout this article, we will treat the optional choice between ground beef and steak strips as a legitimate decision point. Both work. Both are included in your ingredient list. We will explain the differences, the techniques required for each, and how to achieve the best results regardless of which you choose.
Now, let us assemble our ingredients and begin the journey to the best Philly Cheesesteak Pasta you have ever tasted.
Ingredients
This recipe serves 4 to 6 people as a main course. The quantities are carefully balanced to create a creamy, meaty, cheesy pasta that is neither dry nor soupy.
For the Pasta:
- 12 oz pasta (penne or rigatoni) – Penne and rigatoni are the recommended shapes. Their ridges and hollow centers are designed to hold sauce. Penne’s angled cuts and ridges trap the creamy beef mixture, while rigatoni’s large, wide tubes capture sauce both inside and out. Do not use long, thin pasta like spaghetti or fettuccine, which will not hold the chunky sauce as effectively. Do not use delicate shapes like orzo or angel hair. A high-quality bronze-die-cut pasta has a rough, porous surface that sauce adheres to better than smooth, Teflon-die pasta.
For the Cheesesteak Filling and Sauce:
- 1 lb ground beef or steak strips – This is your primary decision point.
- Ground beef: Use 80/20 (80% lean, 20% fat) for maximum flavor and juiciness. Leaner ground beef (90/10 or 93/7) will produce a drier, less flavorful result. Ground beef creates a rustic, hearty, spoonable filling that melds seamlessly into the sauce.
- Steak strips: For a more authentic cheesesteak texture, use thinly sliced ribeye, sirloin, or flank steak. Partially freeze the steak for 20-30 minutes before slicing to achieve paper-thin strips. Steak strips provide a more traditional chew and a higher-end presentation. If using steak strips, increase the cooking time slightly to ensure browning.
- 1 green bell pepper, diced – One medium green bell pepper yields approximately 1 cup of diced pepper. Green bell peppers are traditional in Philly cheesesteaks. They have a slightly bitter, grassy flavor that balances the richness of the cream cheese and beef. You may substitute red or yellow bell peppers for sweetness, but green is authentic.
- 1 onion, diced – One medium yellow or white onion yields approximately 1 cup of diced onion. Yellow onions have the best balance of sweetness and savory depth when sautéed. Red onions work but are slightly sharper. Avoid sweet onions like Vidalia, which can become overly sweet and lose structural integrity.
- 2 cloves garlic, minced – Fresh garlic is essential. Mince it finely or use a garlic press. Do not use jarred, pre-minced garlic, which has a harsh, metallic flavor due to preservatives.
- 8 oz cream cheese, softened – Full-fat cream cheese is non-negotiable for this recipe. Reduced-fat or fat-free cream cheese contains stabilizers and additional water, resulting in a thin, grainy, or broken sauce. “Softened” means the cream cheese should be at room temperature (about 70°F / 21°C) for at least 30 minutes before cooking. Cold cream cheese will not incorporate smoothly and will leave lumps. Cut the cold block into cubes to speed up softening.
- 1 cup shredded provolone cheese – Provolone is the classic cheesesteak cheese. It melts beautifully, has a mild, buttery, slightly tangy flavor, and browns well under the broiler. Shred it yourself from a block of provolone. Pre-shredded provolone contains anti-caking agents (cellulose, potato starch) that prevent smooth melting and browning. If provolone is unavailable, substitute with mozzarella (milder, stringier) or white American cheese (creamier, saltier). Do not use cheddar, which has a sharper flavor and different melting properties.
- 1 cup beef broth – Use low-sodium or regular beef broth. This forms the liquid base of the creamy sauce. Low-sodium is preferred because you can control the salt level. Do not use water or vegetable broth, which will result in a thin, flavorless sauce. A high-quality beef broth (look for “broth” not “stock,” though either works) adds depth and umami.
- 1 tbsp olive oil – Extra-virgin or regular olive oil. This is used for sautéing the vegetables and browning the beef. Its fruity notes complement the savory elements.
- Salt and pepper to taste – Use fine sea salt or kosher salt and freshly ground black pepper. Season in layers: add salt and pepper when browning the beef, then taste and adjust at the end.
Special Equipment:
- Large pot (5-6 quart / 5-6 liter) for boiling pasta
- Large, oven-safe skillet (12-inch / 30cm) – cast iron or stainless steel with an oven-safe handle. Do not use a skillet with a plastic or rubber handle, as it will go under the broiler.
- Colander for draining pasta
- Sharp chef’s knife and cutting board
- Wooden spoon or silicone spatula
- Measuring cups and spoons
- Cheese grater (if shredding provolone from a block)
- Aluminum foil (optional, for covering if needed)
Preparation Method
This method is organized into four logical phases: preparing the pasta, cooking the cheesesteak filling and sauce, combining everything, and broiling the provolone topping. Read through the entire method before beginning. The pasta and the sauce can be made simultaneously if you are comfortable multitasking, but first-time makers should complete the pasta first, then focus on the sauce.
Phase 1: Cook the Pasta
Properly cooked pasta is the foundation of this dish. Overcooked pasta will become mushy under the broiler.
Step 1.1: Boil the water.
Fill a large pot with water. Use approximately 4 quarts (4 liters) of water for 12 ounces of pasta. Add a generous amount of salt—about 1 tablespoon of kosher salt or 2 teaspoons of fine sea salt. The water should taste like the sea. This is the only opportunity to season the pasta itself. Bring the water to a rolling boil over high heat.
Step 1.2: Cook the pasta al dente.
Add the 12 oz of penne or rigatoni to the boiling water. Stir immediately to prevent sticking. Cook according to the package instructions, but check for doneness 1-2 minutes before the suggested time. Al dente (Italian for “to the tooth”) means the pasta is tender but still firm when bitten. There should be a slight white core in the center of the noodle. Overcooked pasta will not hold its shape or absorb the sauce properly.
Step 1.3: Drain and set aside.
Reserve 1/2 cup of the pasta cooking water before draining. This starchy water can be used to loosen the sauce if it becomes too thick. Drain the pasta in a colander. Do not rinse the pasta. Rinsing removes the surface starch that helps sauce adhere. Set the drained pasta aside in the colander or return it to the pot (off the heat) and cover loosely.
Phase 2: Prepare the Cheesesteak Filling and Creamy Sauce
This phase happens in a single skillet, building flavors sequentially. The cream cheese and beef broth combination creates the sauce without requiring a separate saucepan.
Step 2.1: Sauté the aromatics.
Place your large, oven-safe skillet over medium heat. Add the 1 tablespoon of olive oil. Heat for 1 minute until the oil shimmers. Add the diced onion and diced green bell pepper. Sauté for 4-5 minutes, stirring occasionally, until the vegetables have softened and the onion becomes translucent. The edges of the bell pepper may develop slight charring, which adds flavor. Add the 2 minced garlic cloves. Sauté for an additional 1 minute, stirring constantly, until the garlic is fragrant. Do not let the garlic brown or burn, as it will become bitter.
Step 2.2: Cook the beef.
Push the sautéed vegetables to one side of the skillet. Add the 1 lb of ground beef or steak strips to the empty side. If using ground beef, break it apart with a wooden spoon into small, bite-sized pieces. If using steak strips, spread them in a single layer. Cook without moving for 2 minutes to allow browning, then stir and combine with the vegetables. Continue cooking until the beef is fully browned. For ground beef, this takes 5-7 minutes. For steak strips, 4-6 minutes. Season generously with salt and freshly ground black pepper during cooking—use approximately 1 teaspoon of salt and 1/2 teaspoon of pepper to start. The beef should be no longer pink.
Critical note: Do not drain the fat. Ground beef with 80/20 ratio will render some fat, but this fat carries flavor and will be incorporated into the sauce. If you used extremely lean ground beef and the pan seems dry, add an extra tablespoon of olive oil.
Step 2.3: Incorporate the cream cheese and broth.
Reduce the heat to medium-low. Add the 8 oz of softened cream cheese to the skillet. Break it into smaller chunks with your spatula. Add the 1 cup of beef broth. Stir continuously. The cream cheese will begin to melt into the broth. Continue stirring for 2-3 minutes until the cream cheese has completely dissolved and the mixture has transformed into a smooth, creamy, uniform sauce. There should be no white lumps of cream cheese visible. The sauce will be relatively thin at this stage but will thicken as it simmers and as the pasta is added.
Step 2.4: Simmer to develop flavor.
Allow the sauce to simmer gently for 3-4 minutes, stirring occasionally. The sauce will thicken slightly as it reduces. Taste the sauce now. Adjust the seasoning with additional salt and pepper if needed. If the sauce is too thick, add a splash of the reserved pasta water (2 tablespoons at a time). If it is too thin, continue simmering for another 2 minutes.
Phase 3: Combine Pasta and Sauce
Step 3.1: Add the cooked pasta.
Add the drained, cooked pasta to the skillet with the creamy beef sauce. Use tongs or a spatula to toss everything together gently but thoroughly. Ensure every piece of pasta is coated in the sauce. The ridges of penne and the tubes of rigatoni should be filled with the creamy, beefy mixture.
Step 3.2: Adjust consistency if needed.
If the pasta seems dry or the sauce is too thick, add the reserved pasta water in small increments (1-2 tablespoons at a time) until the desired consistency is reached. The final dish should be creamy and saucy but not soupy. Remember that the pasta will absorb some liquid as it sits.
Phase 4: Top with Provolone and Broil
This final step transforms a creamy pasta into a showstopping casserole. The broiler creates a golden, bubbly, blistered cheese crust that contrasts beautifully with the creamy interior.
Step 4.1: Preheat the broiler.
Position an oven rack 6 inches (15 cm) below the broiler element. Preheat your oven’s broiler to high. If your oven has a low broiler setting, use high. Allow the broiler to heat for at least 5 minutes before proceeding.
Step 4.2: Top with provolone cheese.
Sprinkle the 1 cup of shredded provolone cheese evenly over the top of the pasta in the skillet. Do not stir it in. The cheese should form a continuous layer. Use all the cheese; do not be shy.
Step 4.3: Broil until melted and golden.
Place the skillet on the oven rack under the broiler. Broil for 3-5 minutes. Watch carefully after the 2-minute mark. Ovens vary significantly. You are looking for the cheese to be fully melted, bubbling, and golden brown in spots. Some dark brown or lightly charred spots are desirable—they add a smoky, complex flavor. Do not allow the cheese to burn black. If your broiler runs hot, reduce the time to 2-3 minutes.
Safety warning: The skillet handle will become extremely hot under the broiler. Use a thick oven mitt or a handle cover when removing the skillet from the oven.
Step 4.4: Rest briefly and serve.
Remove the skillet from the oven. Let the Creamy Philly Cheesesteak Pasta rest for 2-3 minutes before serving. This allows the sauce to set slightly and prevents burns from the molten cheese. Serve hot, directly from the skillet if desired, or transfer to a serving platter. The dish is complete as is, but a final crack of fresh black pepper over the top adds a pleasant pungency.
Conclusion
You have just created a dish that honors the spirit of the Philly cheesesteak while embracing the comfort of creamy pasta. The Creamy Philly Cheesesteak Pasta, made with the ingredients you provided—ground beef or steak strips, green bell pepper, onion, garlic, cream cheese, shredded provolone cheese, penne or rigatoni, beef broth, olive oil, salt, and pepper—is a testament to the power of simple, high-quality ingredients when combined with proper technique.
Let us reflect on why this recipe succeeds. The choice between ground beef and steak strips allows you to tailor the dish to your preference for texture and convenience. The green bell pepper and onion, sautéed until softened, provide a sweet-savory aromatic base that is unmistakably Philly. The cream cheese, softened and melted into beef broth, creates a sauce that is creamy without being heavy, tangy without being sour, and stable without requiring a roux or reduction. The provolone cheese, melted under the broiler until golden and bubbling, adds a crispy, cheesy crown that makes every forkful an experience. The pasta, cooked al dente and tossed in the sauce, holds everything together in a cohesive, satisfying whole.
This recipe is also remarkably adaptable. You can add mushrooms (sautéed with the onions and peppers) for earthy depth. You can add a pinch of red pepper flakes for heat. You can swap the green bell pepper for a mix of red and yellow for sweetness and color. You can use white cheddar instead of provolone for a sharper finish. The technique remains the same.
Below, you will find detailed answers to the most common questions about this recipe. These FAQs address ingredient substitutions, troubleshooting common problems (grainy sauce, tough beef, stuck pasta), storage and reheating, and dietary adaptations. Whether you are wondering about using cream cheese straight from the refrigerator, how to prevent the sauce from breaking, or whether you can make this dish ahead of time, you will find the answer here.
Frequently Asked Questions (FAQs)
Q1: Should I use ground beef or steak strips? Which is better?
Neither is objectively better; they produce different results. Ground beef (80/20) creates a rustic, hearty, more forgiving dish. The ground meat melds into the sauce, creating a uniform, spoonable texture. It is also more affordable and cooks faster. Steak strips (thinly sliced ribeye or sirloin) create a more authentic cheesesteak texture with distinct, tender pieces of meat that provide a more substantial chew. Steak strips offer a higher-end presentation. For the most authentic Philly experience, use thinly sliced ribeye. For the easiest, most weeknight-friendly version, use ground beef. Both are excellent.
Q2: My cream cheese sauce turned out lumpy or grainy. What went wrong?
Lumpy or grainy cream cheese sauce is almost always caused by one of three issues:
- Cream cheese was not softened. Cold cream cheese straight from the refrigerator will not melt smoothly. It will break into small, stubborn lumps. Always soften cream cheese at room temperature for 30-60 minutes before cooking.
- Heat was too high. Adding cream cheese to a boiling or very hot liquid causes the protein to seize and become grainy. Reduce the heat to medium-low before adding the cream cheese and broth.
- You did not stir continuously. Cream cheese needs constant whisking or stirring as it melts. If left sitting, it will clump.
If your sauce is already lumpy, you can sometimes rescue it by transferring it to a blender (carefully, in batches) and blending until smooth, then returning it to the skillet.
Q3: Can I use a different pasta shape?
Yes, but with guidelines. The best alternatives are short, tubular, or ridged shapes that capture sauce. Excellent options include:
- Rigatoni (as recommended)
- Penne (as recommended)
- Ziti (smooth tubes, slightly less sauce adherence but acceptable)
- Cavatappi (corkscrew shape, excellent sauce capture)
- Fusilli (spiral shape, good sauce capture)
Do not use long, thin pasta (spaghetti, fettuccine, linguine, bucatini) or delicate shapes (angel hair, orzo, ditalini). These will not hold the chunky sauce and will result in a messy, unsatisfying dish.
Q4: Can I use a different cheese instead of provolone?
Yes, but provolone is traditional and recommended for its melting properties and mild, buttery flavor. Substitutions:
- Mozzarella: Milder, stringier, and less flavorful. It will melt beautifully but brown less effectively under the broiler. Use whole-milk mozzarella, not fresh (which has too much water).
- White American cheese: Creamier, saltier, and melts into an ultra-smooth sauce. Use deli-counter white American, not individually wrapped slices. The flavor is milder than provolone.
- Fontina: Excellent melting cheese with a slightly nutty, earthy flavor. A great substitute.
- Gruyère: More expensive, nuttier, and more complex. Delicious but not traditional.
Do not use cheddar (sharper, melts differently, can become oily), Parmesan (too salty, does not melt into a cohesive layer), or blue cheese (overpowering).
Q5: The pasta stuck together after draining. What did I do wrong?
Pasta sticks together for two reasons:
- Insufficient water. Use at least 4 quarts of water for 12 ounces of pasta. Less water means higher starch concentration, leading to stickiness.
- No oil or stirring. You do not need to add oil to pasta water (it prevents sauce from adhering), but you must stir the pasta immediately after adding it to the boiling water and again 1 minute later.
- Pasta sat too long after draining. If you cooked the pasta well before the sauce was ready, it may have clumped. Toss the drained pasta with a tiny drizzle of olive oil if it must sit for more than 5 minutes.
To fix already-stuck pasta, rinse it briefly with warm water to loosen the clumps, then drain again. You will lose some starch, but the sauce will still adhere reasonably well.
Q6: Can I make this dish ahead of time?
Yes, but with adjustments. The dish is best fresh from the broiler, but it can be made ahead and reheated.
- Refrigerator (up to 3 days): Prepare the dish completely, including broiling. Let cool, then cover and refrigerate. To reheat, place the skillet (if oven-safe) or transfer to a baking dish. Cover with foil and bake at 350°F (175°C) for 15-20 minutes until hot. Remove foil for the last 5 minutes to re-crisp the cheese. Alternatively, reheat individual portions in the microwave (the cheese will not be crispy, but the flavor remains good).
- Freezer (up to 2 months): Prepare the dish through the combining step (before adding the provolone topping). Do not broil. Cool completely, transfer to a freezer-safe container, and freeze. Thaw overnight in the refrigerator. Transfer to an oven-safe dish, top with provolone, and bake at 375°F (190°C) for 20-25 minutes, then broil for 2-3 minutes to brown the cheese.
Q7: My steak strips turned out tough and chewy. How can I prevent that?
Tough steak strips are usually the result of overcooking or using the wrong cut of beef. Here is how to achieve tender steak strips:
- Use the right cut: Ribeye is the best choice for cheesesteaks due to its marbling. Sirloin is acceptable but leaner. Do not use round steak, chuck, or brisket, which are tough cuts meant for slow cooking.
- Slice thinly against the grain: Partially freeze the steak for 20-30 minutes, then slice it as thinly as possible (1/8 inch or thinner). Always slice perpendicular to the muscle fibers (“against the grain”).
- Do not overcook: Steak strips need only 4-6 minutes total. They should be just browned and cooked through. Overcooking causes moisture loss and toughness.
- Consider a quick marinade: Toss the steak strips with 1 tablespoon of soy sauce or Worcestershire sauce and let sit for 10 minutes before cooking. The acid helps tenderize.
Q8: Can I add mushrooms to this recipe?
Absolutely. Sautéed mushrooms are a common addition to Philly cheesesteaks. Add 8 oz of sliced cremini or white button mushrooms to the skillet along with the onions and bell peppers. Sauté for 5-6 minutes until the mushrooms have released their liquid and begun to brown. Then proceed with adding the garlic and beef. No other adjustments are needed.
Q9: The sauce broke or separated after I added the pasta. Why?
A broken sauce (where the fat separates from the liquid, looking greasy or curdled) can happen for several reasons:
- Heat too high after adding cream cheese. Cream cheese emulsions are stable but not indestructible. Boiling the sauce after the cream cheese has melted can cause separation.
- Acid imbalance. This recipe has no significant acid, so this is unlikely unless you added something like lemon juice or vinegar.
- Over-stirring after adding pasta. Vigorous stirring can break the emulsion. Toss gently.
To prevent breaking, keep the heat at medium-low or low once the cream cheese is incorporated. If the sauce does break, remove the skillet from the heat immediately. Add 2 tablespoons of cold beef broth or cold water and whisk vigorously. The cold liquid can sometimes re-emulsify the sauce.
Q10: Can I use low-fat cream cheese or Neufchâtel?
You can, but the results will be inferior. Neufchâtel (one-third less fat than cream cheese) contains more water and stabilizers. The sauce will be thinner, less creamy, and more prone to graininess. Fat-free cream cheese should be avoided entirely—it will not melt properly and will result in a gluey, unpleasant texture. For the best results, use full-fat cream cheese. If you must reduce fat, use Neufchâtel and add 2 tablespoons of grated Parmesan cheese to help with texture and flavor.
Q11: How do I store leftovers, and how long do they last?
Store leftovers in an airtight container in the refrigerator for up to 4 days. The pasta will absorb more sauce as it sits, so leftovers will be less creamy but still delicious. To reheat, add a splash of beef broth or milk (1-2 tablespoons per serving) and reheat gently in a skillet over medium-low heat, stirring frequently. Alternatively, microwave in 30-second bursts, stirring between bursts. Do not reheat under the broiler, as the pasta may dry out.
Q12: Can I make this dish in a slow cooker or Instant Pot?
This dish is not ideal for slow cookers or pressure cookers because of the cream cheese and the broiling step. However, you can adapt:
- Slow cooker: Brown the beef and sauté the vegetables in a skillet first (Steps 2.1-2.2). Transfer to a slow cooker. Add the cream cheese (cut into cubes) and beef broth. Cook on LOW for 2-3 hours, stirring once. Cook the pasta separately and stir it in at the end. Transfer to an oven-safe dish, top with provolone, and broil.
- Instant Pot: Use the Sauté function for Steps 2.1-2.2. Add the cream cheese and broth, then pressure cook on HIGH for 0 minutes (yes, zero—just bring to pressure and release immediately). This melts the cream cheese quickly. Cook the pasta separately. Combine and broil as directed.
In both cases, the result is softer and less defined than the stovetop version, but still tasty.
Q13: Why do I need to soften the cream cheese? Can I just microwave it?
You can microwave cream cheese to soften it, but do so carefully. Cut the 8 oz block into cubes. Microwave in a microwave-safe bowl on 50% power for 15-second intervals, stirring between each, until soft but not melted (about 45-60 seconds total). Do not microwave on full power, as the cream cheese can melt unevenly or even explode. Alternatively, leave it on the counter for 30-60 minutes. Do not add cold cream cheese directly to the hot skillet.
Q14: The provolone cheese did not brown under the broiler. What went wrong?
Provolone browns well, but several factors can prevent browning:
- Broiler not preheated. Always preheat the broiler for at least 5 minutes before using.
- Oven rack too low. The cheese needs to be close to the broiler element—about 6 inches (15 cm) is ideal.
- Cheese was too thick. A very thick layer of cheese insulates itself. Shredded cheese browns better than slices because of the increased surface area.
- Cheese was too moist. Pre-shredded cheese (with anti-caking agents) can resist browning. Shred your own.
If your cheese is melted but not brown, you can switch the oven to bake at 450°F (230°C) for 2-3 minutes, or use a kitchen torch carefully.
Q15: Can I add red pepper flakes or other spices for heat?
Yes. Add 1/2 teaspoon of red pepper flakes along with the garlic in Step 2.1. Alternatively, add a pinch of cayenne pepper or a few dashes of hot sauce (like Tabasco or Frank’s RedHot) to the sauce when you add the beef broth. The heat cuts through the richness beautifully. For a more complex flavor, add 1/2 teaspoon of smoked paprika or dried oregano.
Q16: This recipe seems rich. What should I serve alongside it?
You are correct—this is an indulgent, creamy, cheesy pasta. Balance it with lighter, fresher sides:
- Simple green salad with lemon vinaigrette (acid cuts richness)
- Roasted broccoli or asparagus (slightly charred, bright)
- Steamed green beans with a squeeze of lemon
- Garlic bread (if you want to double down on comfort)
- Pickled vegetables (pepperoncini, pickled red onions, or cornichons)
Avoid serving with additional creamy or fried sides, which would make the meal overwhelmingly heavy.
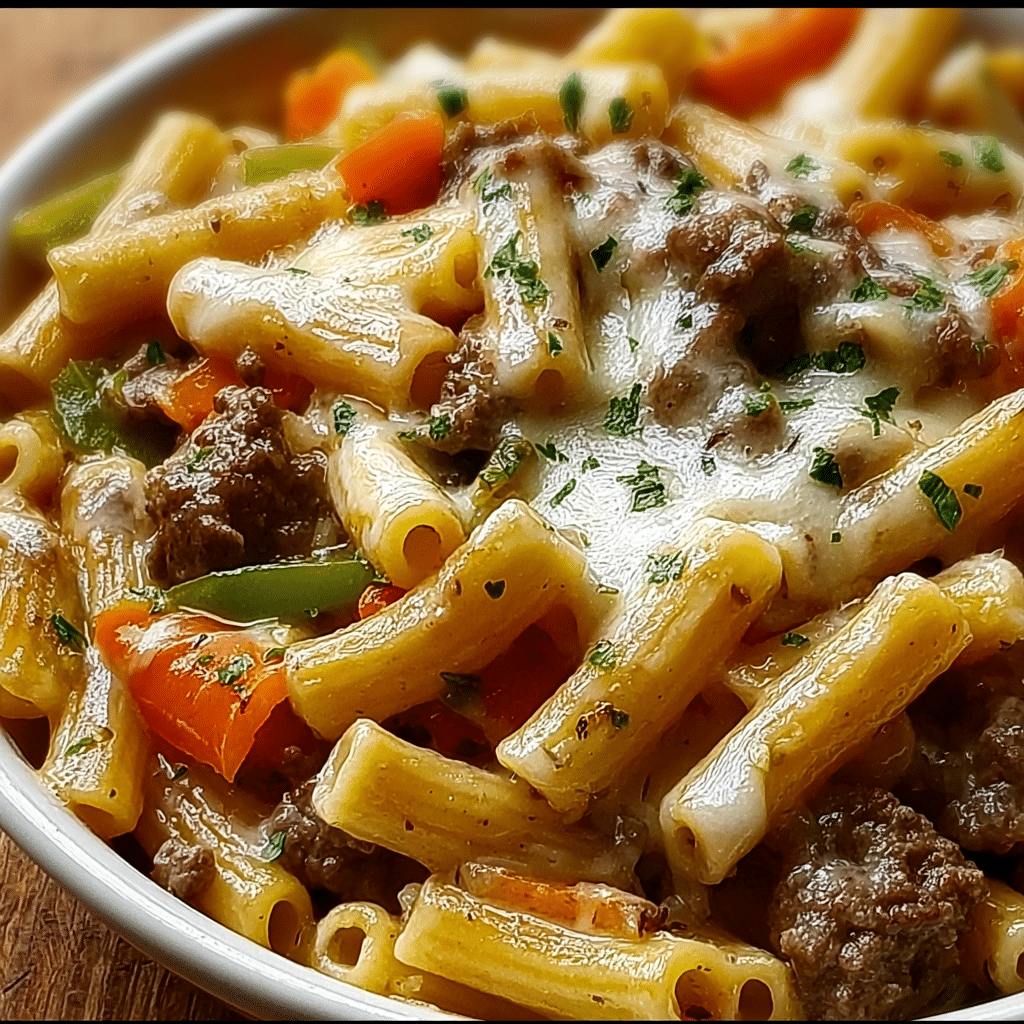
Creamy Philly Cheesesteak Pasta
Creamy Philly Cheesesteak Pasta loaded with tender beef, sautéed peppers and onions, and a rich cheesy sauce. A comforting, hearty twist on the classic sandwich.
- Prep Time: 10 minutes
- Cook Time: 25 minutes
- Total Time: 35 minutes
- Yield: 4 servings
- Category: Main Dish
- Method: Stovetop + Broil
- Cuisine: American
Ingredients
- 1 lb ground beef or steak strips
- 1 green bell pepper, diced
- 1 onion, diced
- 2 cloves garlic, minced
- 8 oz cream cheese, softened
- 1 cup shredded provolone cheese
- 12 oz pasta (penne or rigatoni)
- 1 cup beef broth
- 1 tbsp olive oil
- Salt and pepper to taste
Instructions
- Bring a large pot of salted water to a boil and cook pasta until al dente. Drain and set aside.
- Heat olive oil in a large skillet over medium heat.
- Sauté onions, bell peppers, and garlic for 4–5 minutes until softened.
- Add beef or steak strips and cook until browned, seasoning with salt and pepper.
- Stir in cream cheese and beef broth, mixing until smooth and creamy.
- Add cooked pasta and toss until fully coated in sauce.
- Top with provolone cheese and broil for 3–5 minutes until melted and golden.
- Serve hot and enjoy immediately.
Notes
- Use ribeye steak for a more authentic cheesesteak flavor.
- Add mushrooms for extra depth.
- Do not overcook pasta to keep it firm in the sauce.