
Introduction
There are certain meals that check every single box. They are quick enough for a busy weeknight. They are healthy enough to feel good about serving to your family. They are packed with protein to keep you full and satisfied. They are bursting with flavor—sweet, savory, garlicky, and just a little bit sticky. And they require minimal cleanup. This High-Protein Honey Garlic Shrimp is that unicorn of a recipe. In less than fifteen minutes, you can transform a pound of simple shrimp into a restaurant-quality dish that tastes like it took hours of careful simmering and reducing.
Shrimp is one of the most underrated proteins in the home kitchen. It cooks in minutes, absorbs flavors beautifully, and is naturally low in calories while being exceptionally high in protein. A single serving of this dish delivers about 25 grams of protein for roughly 250 calories, making it a dream come true for anyone tracking their macros, following a low-carb lifestyle, or simply trying to eat more whole foods. But this recipe is not just for the health-conscious. It is for anyone who loves bold, sticky-sweet-savory flavors—the kind of sauce that clings to every curve of the shrimp and begs to be spooned over a bed of rice or quinoa.
The sauce is the star here. Honey provides natural sweetness and that signature sticky glaze. Fresh garlic (four whole cloves—do not skimp) adds pungent, aromatic depth. Soy sauce brings salty umami that balances the sweetness perfectly. A touch of olive oil rounds everything out. And for those who like a thicker, clingier sauce, a single teaspoon of cornstarch transforms the mixture into a glossy, luxurious coating that would be right at home in your favorite takeout restaurant.
What makes this recipe particularly genius for busy cooks is its speed and simplicity. There is no marinating required. No complicated reduction technique. No obscure ingredients. The entire cooking process—from raw shrimp to finished dish—takes less than ten minutes on the stovetop. That is faster than ordering delivery, and infinitely more satisfying. Plus, it is a one-skillet meal, which means minimal dishes and maximum ease.
In the following sections, you will learn not just how to execute this recipe step by step, but also why each technique matters. You will discover how to avoid rubbery, overcooked shrimp, how to achieve that perfect sticky glaze, how to adjust the sauce to your preferred consistency, and how to customize the dish for dietary needs or personal taste. You will also find detailed answers to the most frequently asked questions about this recipe, from substitutions and storage to scaling up for a crowd.
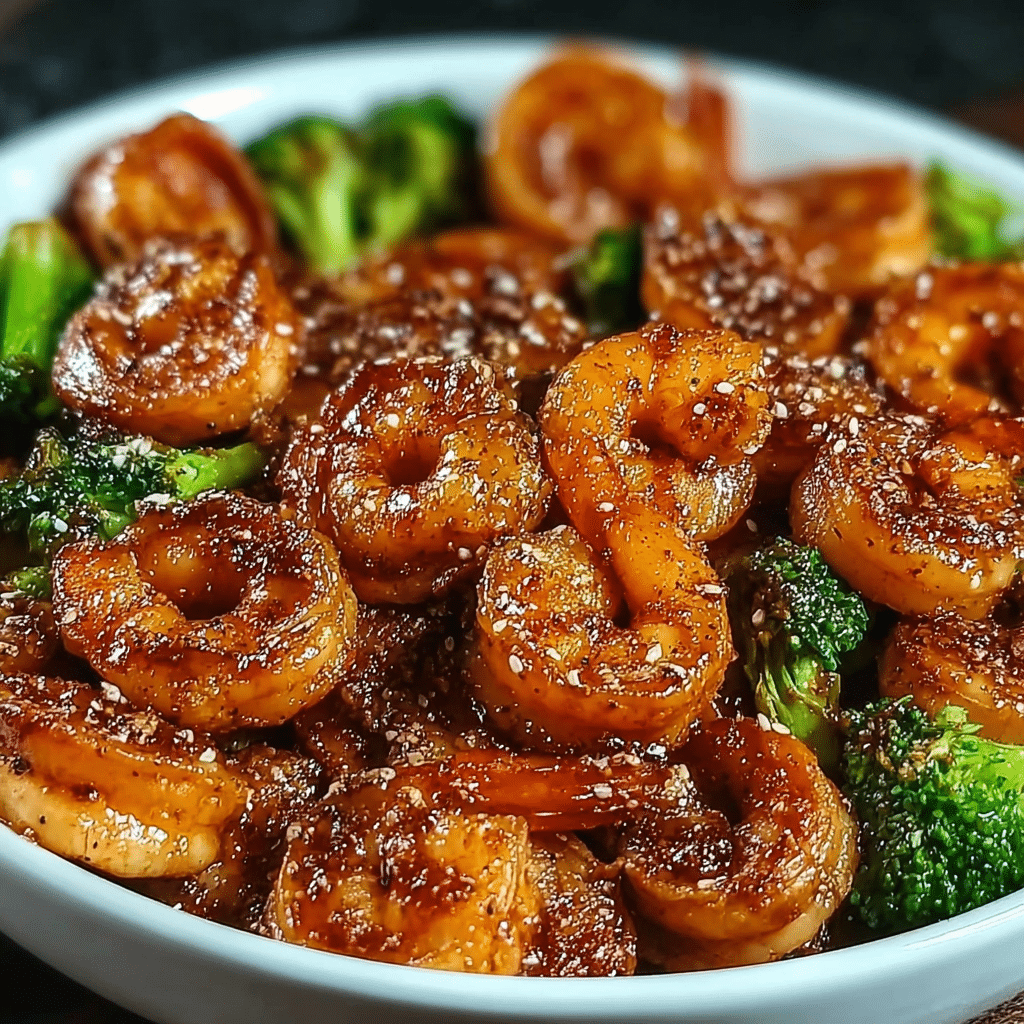
By the time you slide those perfectly pink, glistening shrimp onto a plate—scattered with green onions and sesame seeds, the sauce pooling beneath them—you will have added a genuinely impressive, lightning-fast dish to your permanent rotation. Let us gather our ingredients and begin.
Ingredients
Before you heat your skillet or mince a single clove of garlic, take a moment to assemble everything. This recipe moves incredibly quickly once cooking begins—shrimp go from raw to overcooked in a matter of minutes—so having all your ingredients prepped and ready is essential.
The Protein
- 1 pound large shrimp, peeled and deveined – Large shrimp (also labeled as 21/25 count, meaning 21 to 25 shrimp per pound) are ideal for this recipe. They are substantial enough to hold up to the heat and sauce without becoming tiny, overcooked morsels. Look for shrimp that are already peeled and deveined to save time. If you buy shrimp with shells on, expect to add about 5 minutes to your prep time. Raw shrimp should be firm, moist, and smell faintly of the sea—not fishy or ammonia-like. Frozen shrimp are perfectly acceptable; thaw them overnight in the refrigerator or run them under cold water for 5–10 minutes before cooking. Pat them very dry with paper towels before they hit the pan (see Step 1 for why this matters).
The Sauce
- ¼ cup honey – Honey is the source of sweetness and that signature sticky glaze. Use pure honey, not honey-flavored syrup or “honey sauce.” Wildflower honey, clover honey, or orange blossom honey all work beautifully. If your honey has crystallized, gently warm the jar in a bowl of hot water or microwave it in a glass container for 10–15 seconds to return it to liquid form. For a slightly different flavor profile, you can substitute maple syrup or agave nectar, though the result will be less intensely sweet and less thick.
- 4 cloves garlic, minced – Fresh garlic is non-negotiable here. Four cloves may sound like a lot, but this dish is called “Honey Garlic Shrimp” for a reason—the garlic should be prominent, pungent, and aromatic. Mince the garlic finely so it distributes evenly through the sauce and cooks quickly without burning. Jarred pre-minced garlic is not recommended; it has a harsh, raw, slightly chemical flavor that does not mellow properly. If you love garlic as much as I do, feel free to add a fifth or sixth clove.
- 2 tablespoons soy sauce – Soy sauce provides salty umami that balances the sweetness of the honey. Use regular or low-sodium soy sauce; both work well, though with low-sodium you may want to add a pinch of salt later. For a gluten-free version, use tamari or coconut aminos (see FAQ #4). Do not use dark soy sauce, which is thicker, sweeter, and less salty.
- 1 tablespoon olive oil – Olive oil is used both in the sauce mixture and for cooking the shrimp. It adds a fruity, peppery note that complements the garlic and honey. You can substitute avocado oil, coconut oil, or any neutral cooking oil. Do not use butter; it can burn at the high heat used to sear the shrimp.
- 1 teaspoon cornstarch (optional, for thickening) – Cornstarch is optional but highly recommended if you want a thick, glossy, clingy sauce that coats the shrimp like a glaze. Without cornstarch, the sauce will be thinner and more like a traditional stir-fry sauce. The cornstarch does not alter the flavor at all—only the texture. If you omit it, the sauce will still be delicious, just less viscous.
The Seasoning
- Salt and pepper, to taste – A little salt enhances the natural sweetness of the shrimp and the honey. Be cautious with salt because soy sauce already contributes significant sodium. Freshly cracked black pepper adds a gentle warmth and earthiness.
The Garnishes
- 2 green onions, sliced (for garnish) – Green onions (scallions) add a fresh, mild onion flavor and a beautiful pop of bright green color. Slice them thinly, using both the white bulb and the green tops. Add them at the very end so they remain crisp and vibrant.
- Sesame seeds (optional, for garnish) – Sesame seeds add a subtle nutty flavor and a lovely visual texture. Toasted sesame seeds are best; you can buy them pre-toasted or toast raw seeds in a dry skillet over medium heat for 2–3 minutes until fragrant and lightly golden. Black sesame seeds make a striking visual contrast if you have them.
Step-by-Step Instructions
Step 1: Prepare the Shrimp
If your shrimp are frozen, thaw them completely. The best method is to transfer them to the refrigerator the night before. For a quicker thaw, place the sealed bag of shrimp in a large bowl of cold water for 10–15 minutes. Do not use warm or hot water, which can begin cooking the shrimp unevenly.
If your shrimp still have shells and veins, peel them. To peel: grasp the legs and peel away the shell starting from the underside. Leave the tail on or remove it—your choice. Tails add a nice visual presentation but are not edible. To devein: use a small, sharp knife to make a shallow cut along the back of the shrimp, then lift out the dark vein with the tip of the knife or rinse it away under cold water.
Critical step: Pat the shrimp very dry with paper towels. Lay the shrimp on a double layer of paper towels, pat the tops dry, then flip and pat the other side. Moisture on the surface of the shrimp will steam rather than sear, preventing that beautiful golden-brown color and leaving you with pale, rubbery shrimp. Do not skip this step.
Season the shrimp lightly with salt and pepper. Set aside.
Step 2: Mix the Sauce
In a small bowl or a liquid measuring cup, combine:
- ¼ cup honey
- 4 cloves garlic, minced
- 2 tablespoons soy sauce
- 1 tablespoon olive oil
Whisk or stir with a fork until the honey is fully incorporated. The mixture will be thin and dark brown. If you want a thicker, glossier sauce that clings to the shrimp, add 1 teaspoon of cornstarch and whisk again until no lumps remain. The cornstarch will dissolve completely.
Set the sauce aside near the stove so it is ready to pour when you need it.
Step 3: Heat the Skillet
Place a large skillet or sauté pan over medium-high heat. A 10-inch or 12-inch skillet is ideal. Nonstick, stainless steel, or cast iron all work well. Let the pan heat for 1–2 minutes—it should be hot enough that a drop of water sizzles and evaporates immediately.
Add a thin drizzle of olive oil (about 1 teaspoon, in addition to the oil already in the sauce) to the pan and swirl to coat the bottom. The oil should shimmer but not smoke.
Step 4: Cook the Shrimp
Arrange the shrimp in a single layer in the hot skillet. Do not overcrowd the pan. If your skillet is not large enough to hold all the shrimp in one layer without touching, cook them in two batches. Overcrowding lowers the pan temperature and causes the shrimp to steam rather than sear.
Let the shrimp cook undisturbed for 1½ to 2 minutes. You will see the edges begin to turn pink and opaque. Using tongs or a spatula, flip each shrimp over. The cooked side should be lightly golden and pink, not brown or burnt.
Cook for another 1 to 1½ minutes on the second side. The shrimp are done when they are pink and opaque throughout, with a gentle curl. They should feel firm to the touch but still springy. Do not overcook. Shrimp go from perfectly tender to rubbery and dry in a matter of seconds.
If cooking in batches: Transfer the first batch of cooked shrimp to a plate and repeat with the remaining shrimp. Return all shrimp to the skillet before adding the sauce.
Step 5: Add the Sauce
Pour the honey garlic sauce over the cooked shrimp in the skillet. Use a spatula or spoon to toss the shrimp gently, ensuring every piece is coated in the sauce.
The sauce will immediately begin to bubble and thicken, especially if you added cornstarch.
Step 6: Simmer and Thicken
Reduce the heat to low. Let the sauce simmer gently for 3 to 5 minutes, stirring occasionally. During this time, the sauce will reduce slightly, thicken (if you used cornstarch), and cling to the shrimp. The shrimp will finish cooking through if they were not already fully done.
Watch the sauce carefully. If it becomes too thick (especially if you used cornstarch), add a splash of water—1 tablespoon at a time—until it reaches your desired consistency. If the sauce is too thin, let it simmer for another minute or two.
The finished sauce should be glossy, thick enough to coat the back of a spoon, and deeply aromatic with honey and garlic.
Step 7: Garnish and Serve
Remove the skillet from the heat. Transfer the shrimp and sauce to a serving platter or individual bowls.
Sprinkle with sliced green onions and sesame seeds (if using). The green onions add freshness and crunch; the sesame seeds add nuttiness and visual appeal.
Serve immediately. This dish is best eaten hot, right off the stove, while the shrimp are tender and the sauce is glossy.
Serving Suggestions
This High-Protein Honey Garlic Shrimp is incredibly versatile. Here are several ways to turn it into a complete meal:
- Over steamed rice: White rice, brown rice, or jasmine rice are all excellent choices. The rice soaks up the extra honey garlic sauce beautifully.
- Over cauliflower rice: For a low-carb or keto-friendly meal, serve over cauliflower rice. The sauce adds plenty of flavor to the neutral vegetable.
- With noodles: Toss with cooked lo mein noodles, rice noodles, or even spaghetti for a quick noodle bowl.
- In lettuce wraps: Spoon the shrimp and sauce into butter lettuce or romaine leaves for a fresh, crunchy, low-carb meal.
- Alongside roasted vegetables: Broccoli, asparagus, snap peas, or bell peppers all pair wonderfully.
- As an appetizer: Serve on a platter with toothpicks for parties or game day.
Conclusion
This High-Protein Honey Garlic Shrimp is the kind of recipe that makes you feel like a culinary genius while requiring almost no effort. In less than fifteen minutes—less time than it takes to order and wait for takeout—you can have a dish that is healthy, protein-packed, bursting with sweet and savory flavor, and beautiful enough to serve to guests. The shrimp stay tender and juicy because you paid attention to the details: patting them dry, searing them in a hot pan, and cooking them just until they turn pink. The honey garlic sauce, thickened with a whisper of cornstarch, clings to every curve of the shrimp like a glossy, sticky treasure.
From a nutritional standpoint, this dish is a winner. Shrimp is one of the leanest, most protein-dense proteins available. A single serving provides about 25 grams of protein for roughly 250 calories, with minimal saturated fat. The honey provides natural sweetness without refined sugar. The garlic and soy sauce add flavor without empty calories. Whether you are following a low-carb diet, a high-protein regimen, or simply trying to eat more whole foods, this recipe fits seamlessly into your lifestyle.
But beyond the numbers, this dish is simply delicious. The balance of sweet honey, salty soy, pungent garlic, and the natural brininess of the shrimp is nothing short of perfection. The green onions and sesame seeds add freshness, crunch, and visual appeal. It is the kind of meal that feels special enough for a date night but easy enough for a Tuesday when you are exhausted and hungry.
Perhaps the greatest compliment this recipe has received came from a home cook who tested it for this article. She wrote: “I made this for dinner last night, and my husband—who usually asks for seconds of everything—asked for thirds. Then he asked if I could make it again next week. It took me less than fifteen minutes. This is magic.” That is the power of a great recipe—it makes the cook look like a hero with almost no effort.
Keep this recipe close. Make it once, and it will become a staple. Make it twice, and you will start experimenting—adding a pinch of red pepper flakes for heat, swapping in ginger for some of the garlic, or tossing in steamed broccoli at the end. The blueprint is yours to build upon.
Frequently Asked Questions (FAQ)
1. Can I use frozen shrimp for this recipe?
Yes, absolutely. Frozen shrimp are often fresher than “fresh” shrimp at the grocery store because they are frozen immediately after harvesting. Thaw them completely before cooking. The best method is to transfer the shrimp from the freezer to the refrigerator the night before. For a quick thaw, place the sealed bag of shrimp in a large bowl of cold water for 10–15 minutes. Do not use warm or hot water, which can begin cooking the shrimp unevenly. Once thawed, pat the shrimp very dry with paper towels before cooking.
2. How do I prevent shrimp from becoming rubbery?
Rubbery shrimp are the result of overcooking. Shrimp cook incredibly quickly—usually 2 to 3 minutes total in a hot skillet. Watch for visual cues: raw shrimp are gray and translucent. As they cook, they turn pink and opaque, curling into a loose “C” shape. When they curl into a tight “O” shape, they are overcooked. Remove them from the heat as soon as they are pink and opaque throughout. Also, patting the shrimp dry before cooking (removing surface moisture) helps them sear rather than steam, which preserves a tender texture.
3. Can I make this recipe without cornstarch?
Yes. The cornstarch is optional; it only affects the texture of the sauce, not the flavor. Without cornstarch, the sauce will be thinner and more like a traditional stir-fry sauce rather than a thick glaze. It will still be delicious. If you omit the cornstarch, you may want to let the sauce simmer for an extra minute or two to reduce and thicken naturally, but it will never become as thick as it would with cornstarch.
4. Is this recipe gluten-free?
As written, no, because traditional soy sauce contains wheat. However, it is very easy to make gluten-free. Substitute the regular soy sauce with tamari (a gluten-free soy sauce) or coconut aminos (a soy-free, gluten-free alternative made from coconut sap). Both work beautifully. If using coconut aminos, note that it is slightly sweeter and less salty than soy sauce, so you may want to add a pinch of salt. All other ingredients (shrimp, honey, garlic, olive oil, cornstarch, salt, pepper, green onions, sesame seeds) are naturally gluten-free.
5. Can I use chicken instead of shrimp?
Yes. Boneless, skinless chicken breasts or thighs work well. Cut 1 pound of chicken into 1-inch cubes. Cook the chicken in the skillet over medium-high heat for 5–7 minutes, stirring occasionally, until golden brown and cooked through (internal temperature of 165°F/74°C). Then add the sauce and simmer as directed. Chicken will take longer to cook than shrimp, so do not follow the shrimp timing. You may also need to add a little more sauce, as chicken absorbs more liquid than shrimp.
6. Can I add vegetables to this dish?
Absolutely. This is a wonderful way to turn the dish into a complete one-pan meal. Add vegetables after cooking the shrimp (or before adding the sauce). Good options include: 1 cup of broccoli florets (steam or blanch first, or add to the skillet with 2 tablespoons of water and cover to steam for 2 minutes), 1 cup of snap peas or snow peas (add to the skillet for the last 1 minute of shrimp cooking), 1 cup of sliced bell peppers (sauté for 1–2 minutes before adding the sauce), or 1 cup of asparagus cut into 1-inch pieces (add to the skillet with the sauce and simmer until tender-crisp, about 2 minutes).
7. How spicy is this dish? Can I add heat?
This dish is not spicy at all as written—it is sweet, savory, and garlicky. To add heat, try any of these: add ¼ to ½ teaspoon of red pepper flakes to the sauce, add 1 teaspoon of sriracha or chili garlic sauce, add ½ teaspoon of freshly grated ginger and a pinch of cayenne pepper, or garnish with thinly sliced fresh red chili peppers. For a honey-sriracha variation, replace 1 tablespoon of the honey with 1 tablespoon of sriracha.
8. How do I store and reheat leftovers?
Store leftovers in an airtight container in the refrigerator for up to 2 days. Reheating shrimp is tricky because they can become rubbery. The best method: place the shrimp and sauce in a nonstick skillet over low heat, add a splash of water (about 1 tablespoon), and warm gently for 1–2 minutes, stirring constantly. Do not microwave if possible; the microwave heats unevenly and will almost certainly overcook the shrimp. If you must microwave, use 50% power in 15-second bursts, checking after each burst.
9. Can I freeze this Honey Garlic Shrimp?
Freezing is not recommended. Shrimp have a delicate texture that degrades significantly upon freezing and thawing. They become mushy and watery. The sauce may also separate. If you must freeze, freeze the sauce separately (without the shrimp) and cook fresh shrimp when you thaw the sauce. The sauce alone freezes well for up to 2 months.
10. Can I use a different sweetener instead of honey?
Yes, but the flavor and texture will change. Maple syrup is the closest substitute; it has a similar viscosity and sweetness level, though it adds a distinct maple flavor. Agave nectar is thinner and less sweet; you may need to use more and simmer longer to achieve a glaze. Brown sugar (¼ cup, packed) can be used, but you will need to add a few tablespoons of water to dissolve it, and the sauce will be less glossy. Do not use artificial sweeteners; they do not caramelize or thicken properly.
11. Why is my sauce not thickening?
If you added cornstarch and your sauce is still thin, there are three possible reasons: (1) You did not simmer the sauce long enough. Cornstarch needs heat to activate. Simmer for a full 3–5 minutes. (2) The heat is too low. Cornstarch thickens best at a gentle simmer, not just warm. (3) You added too much liquid (if you added water or extra soy sauce). To fix a thin sauce, mix an additional ½ teaspoon of cornstarch with 1 teaspoon of cold water to make a slurry, stir it into the sauce, and simmer for another 1–2 minutes.
12. Can I double this recipe for a crowd?
Yes. Double all ingredients and use a very large skillet (14 inches or larger) or a Dutch oven. Do not overcrowd the shrimp when searing; cook them in two batches if necessary. The sauce will take slightly longer to thicken (4–6 minutes instead of 3–5). A double batch serves about 6–8 people as a main dish or 10–12 as an appetizer.
13. Can I prepare the sauce in advance?
Yes. The honey garlic sauce can be made up to 3 days in advance and stored in an airtight container in the refrigerator. The cornstarch may settle at the bottom, so whisk or shake the sauce vigorously before using. You can also make a larger batch of sauce and keep it on hand for quick meals. The sauce also freezes well for up to 2 months.
14. What is the best way to peel and devein shrimp?
If you bought shrimp with shells on, here is the quickest method: Hold the shrimp in one hand and use your other hand to grasp the legs. Peel the shell away starting from the underside, working from the head end toward the tail. You can leave the tail on for presentation or pull it off. To devein, use a small, sharp knife to make a shallow cut along the curved back of the shrimp. You will see a dark or translucent vein. Lift it out with the tip of the knife or rinse it away under cold running water. Pat the shrimp dry before cooking.
15. Can I use pre-cooked shrimp?
You can, but it is not recommended. Pre-cooked shrimp are already fully cooked, so they only need to be warmed through. If you use pre-cooked shrimp, add them to the skillet after the sauce has simmered and thickened, then toss just until heated (about 30 seconds). Do not cook them for the full 2–3 minutes, or they will become rubbery. Raw shrimp yield a better texture and absorb the sauce more effectively.
16. Is this dish keto-friendly?
As written, no, because honey is high in sugar (about 17 grams of sugar per tablespoon). For a keto-friendly version, substitute the honey with a sugar-free honey alternative (like Lakanto or ChocZero) or use 2 tablespoons of allulose or erythritol plus 2 tablespoons of water. You may also need to add a little extra cornstarch to achieve the right texture. The flavor will not be identical, but it will be close.
17. What should I do if my sauce is too salty?
If your sauce is too salty, there are a few fixes. Add a splash of water (1 tablespoon at a time) to dilute the saltiness. Add an extra teaspoon of honey to balance the salt with sweetness. If you have not yet added the cornstarch, you can also add a few more raw shrimp (if you have them) to absorb some of the salt; remove them once they are cooked and discard or eat them. For next time, use low-sodium soy sauce and taste before adding any extra salt.
18. Can I cook this recipe in an air fryer?
This recipe is designed for stovetop cooking, but you can adapt it for the air fryer with modifications. Cook the shrimp in the air fryer at 400°F (200°C) for 5–6 minutes, shaking the basket halfway through, until pink and opaque. While the shrimp cook, prepare the sauce in a small saucepan on the stovetop (or in the microwave) by combining honey, garlic, soy sauce, olive oil, and cornstarch, then heating until thickened. Toss the cooked shrimp in the sauce and serve. The result will be slightly different (less caramelization on the shrimp) but still delicious.
PrintHigh-Protein Honey Garlic Shrimp: An Easy, Flavor-Packed Healthy Recipe

This high-protein honey garlic shrimp recipe is quick, healthy, and packed with bold flavor. Juicy shrimp coated in a sweet and savory garlic glaze make the perfect easy meal.
- Prep Time: 5 minutes
- Cook Time: 10 minutes
- Total Time: 15 minutes
- Yield: 4 servings
- Category: Main Dish, Seafood
- Method: Stovetop
- Cuisine: Asian Fusion
Ingredients
- 1 lb large shrimp, peeled and deveined
- 1/4 cup honey
- 4 cloves garlic, minced
- 2 tbsp soy sauce
- 1 tbsp olive oil
- 1 tsp cornstarch (optional)
- Salt and pepper to taste
- 2 green onions, sliced
- Sesame seeds (optional)
Instructions
- Pat shrimp dry and set aside.
- Mix honey, garlic, soy sauce, and olive oil in a bowl.
- Heat skillet over medium-high heat and cook shrimp for 2–3 minutes.
- Season with salt and pepper.
- Pour in sauce and toss to coat.
- Simmer until sauce thickens and shrimp are cooked through.
- Garnish with green onions and sesame seeds.
- Serve immediately.
Notes
- Do not overcook shrimp to keep them tender.
- Add cornstarch for a thicker glaze.
- Great served with rice or vegetables.